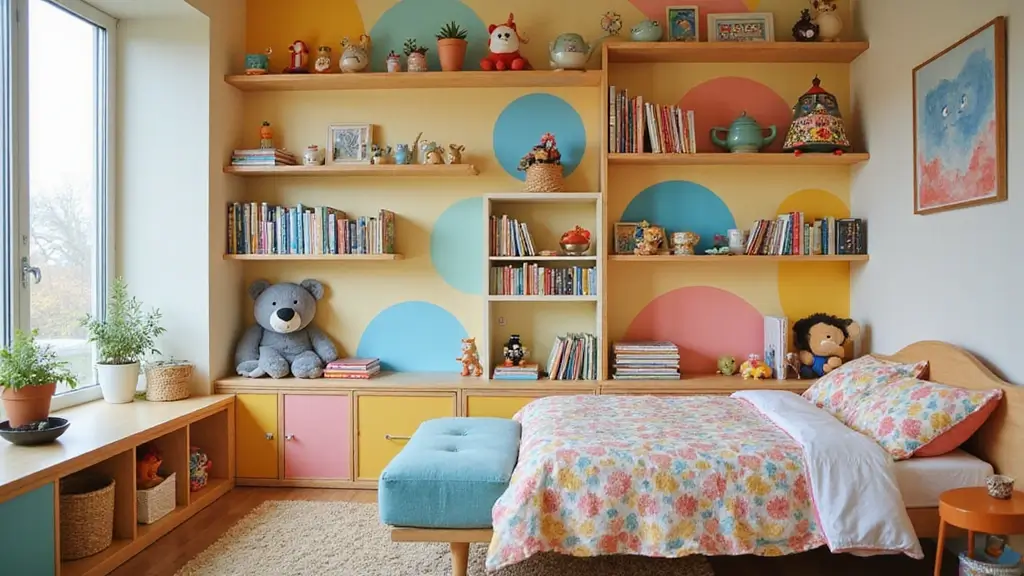
This season has me thinking about kids rooms that are cute and easy to tidy. Shelves can do a lot of heavy lifting. They hold toys, books, and art, so things stop piling up on the floor. I made this post to show how simple shelves can change a room fast.
Let’s break it down. If you’re a busy parent, a caregiver, or someone who designs spaces for kids, this one’s for you. You want spaces that feel calm, safe, and easy to keep in order.
Here is why you’ll want this guide: you get 30 shelving ideas for kids’ bedrooms that are cute and organized. I include clear notes on size, placement, and the best materials so you can pick options that fit your space. You’ll also see quick setup tips you can act on this weekend.
From floating shelves by the bed to cube organizers in a shared room, these ideas cover many tastes. These kids bedroom shelving ideas include wall shelves, corner units, and toy organizers. You’ll see wood, white, pastel, and metal styles. Each idea keeps safety in mind and helps kids grab what they need without tipping a shelf.
These ideas are not just pretty. They are practical. You’ll get tips on where to place shelves for easy reach, how to choose baskets and boxes, and simple steps to install. Start with one shelf near a study desk or reading nook, then grow as you learn what your child uses.
Next steps. Pick a spot, choose a vibe, and try one idea this week. The examples here are easy to adapt, so you can mix and match to fit your room and your budget.
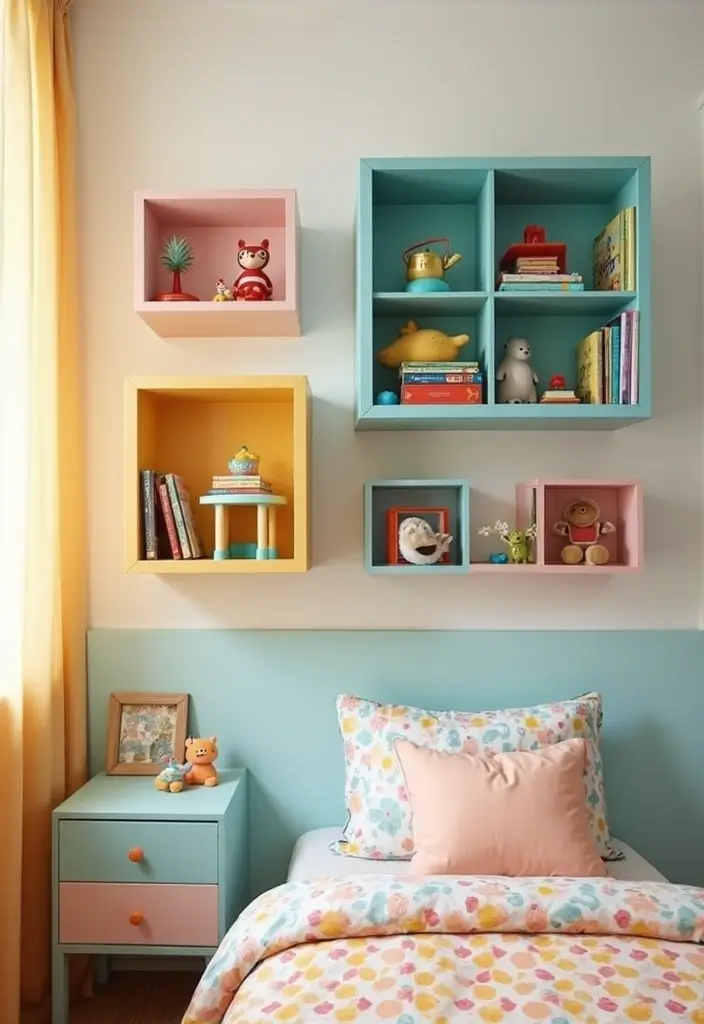
1. Floating Shelves with a Twist
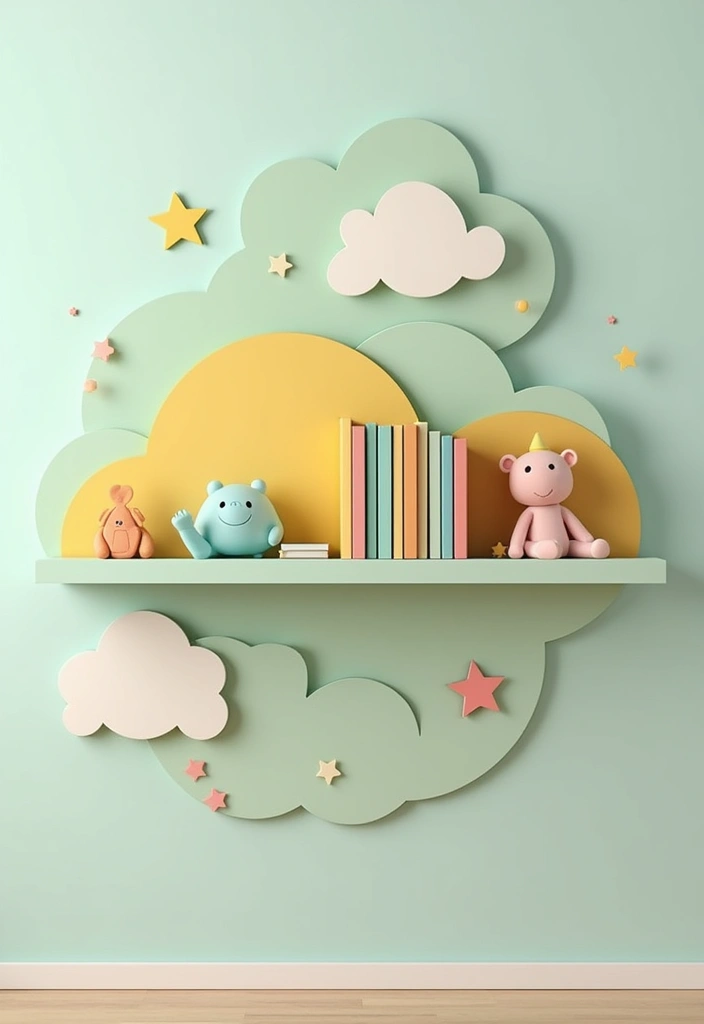
Need to save floor space and add a playful touch to your kid’s room? Floating shelves can do both. If you’re exploring kids bedroom shelving ideas, this is a smart place to start. They sit close to the wall, so the floor stays open for play.
Choose shelves with a twist. Look for colors and shapes like clouds, stars, or friendly animals. These shelves become a wall feature that also holds books, tiny toys, and keepsakes. Use wood or sturdy MDF, painted with kid-safe finishes.
Here is how to get the best result. Install shelves into wall studs so they stay strong. Keep the weight light and vary the heights. Let the edges be rounded for safety.
Tips:
– Use different heights to create a playful ladder of storage.
– Add small potted plants or framed photos for a personal touch.
– Use magnets to attach lightweight toys or art for easy access.
– Let your child choose favorite themes to personalize the look.
Let your kid help with the setup. Show them how to swap items as they grow. With a twist on the usual shelf, you get a space that feels fun and organized. This style works well in small rooms and can be updated as they grow.
2. Bookshelf with a Playhouse Design
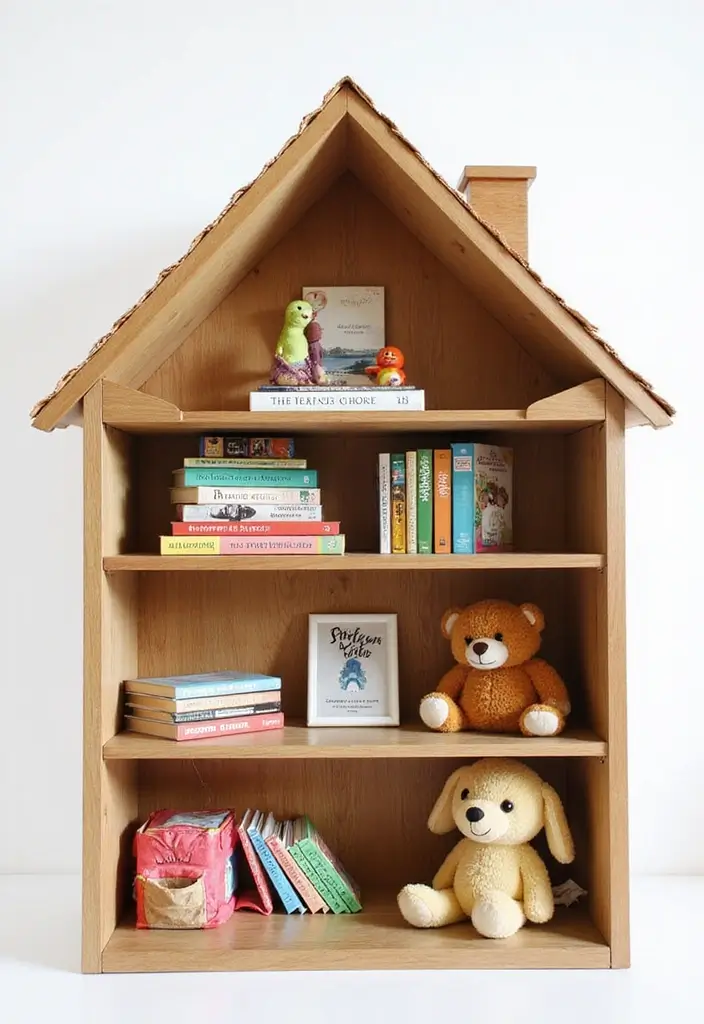
If you want books to stay put and your child to have a fun corner to play, try a bookshelf that looks like a tiny house. It keeps the room neat and gives a cozy spot for reading and make-believe.
Here is how to make it work. Start with a sturdy, kid-friendly bookcase. The base should be stable enough for shelves and a little roof. Shape the front into a house by adding a simple back panel that rises into a peaked roof. You can attach a small doorway cutout to hint at a play space, even if it can’t be opened.
Ideas to bring it to life:
– Paint the bookshelf in your child’s favorite colors for instant charm.
– Add a short curtain across the doorway to reveal a secret reading nook.
– Decorate the top with soft fairy lights for a warm glow at night.
– Place low shelves inside to keep picture books easy to grab.
– Use baskets or bins on the lower shelves for toys and blocks.
– Put a small rug in front to create a comfy floor space.
Safety and upkeep
Choose water-based paints and smooth edges. Sand any rough spots. Check screws every few weeks. Wipe surfaces with a damp cloth to keep it clean.
Next steps: measure your wall, pick colors, and gather lights, a curtain, and baskets. In a weekend, you can turn a plain shelf into a cute, organized playhouse that grows with your child.
3. Stackable Crates for Custom Organization
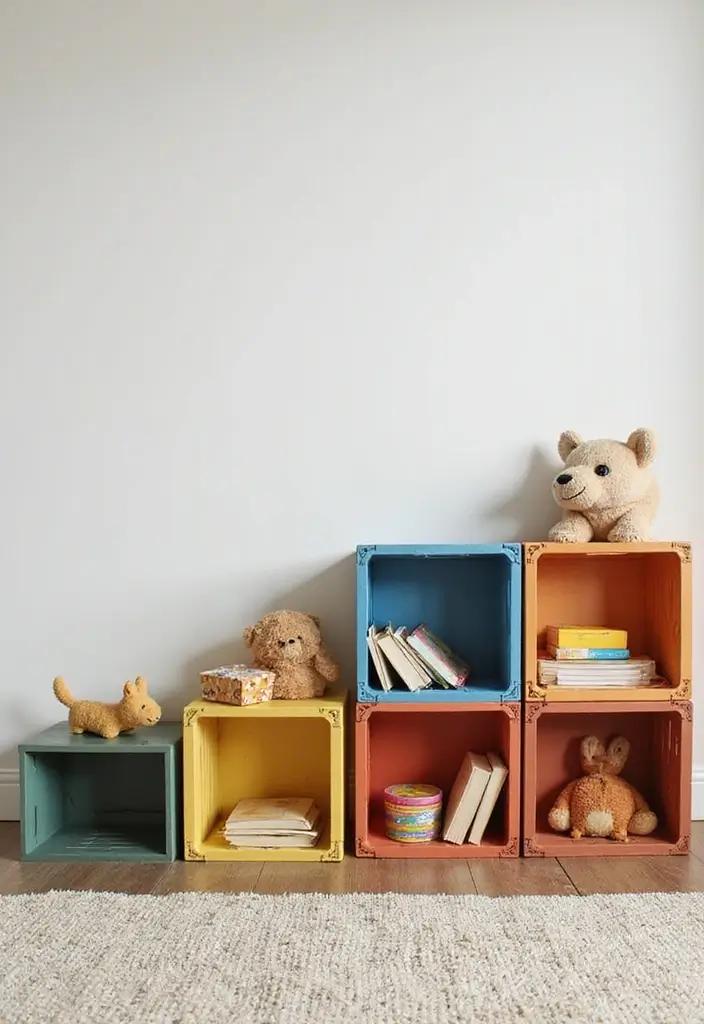
Running out of space in your kid’s room? Stackable crates offer a simple, friendly way to mix storage with style. They add warmth or color while keeping toys easy to reach. You can choose wooden crates or plastic crates.
Benefits:
– Easy to customize with paint or stickers.
– Great for storing larger toys and art supplies.
– Can be moved around as needed, giving you flexibility.
Here is why this works. Crates come in many sizes. You can paint them, wrap them with washi tape, or add simple stickers to label what goes inside. Place the crates where your child can reach them. That helps them learn to tidy up.
How to set them up:
– Start with 3 to 6 crates in a row or stack them into a tall tower. A grid of three by two works well on a wall shelf.
– Use colors that match the room. Let kids pick hues to boost ownership.
– Use a mix of crate sizes: big ones for blankets or art supplies, small ones for markers and tiny toys.
– Label with pictures for pre-readers.
Safety and upkeep:
– Secure the stack to the wall or anchor it to avoid tipping.
– Move crates as your child grows. Keep the layout flexible.
Try a small setup this weekend.
4. Corner Shelving Units
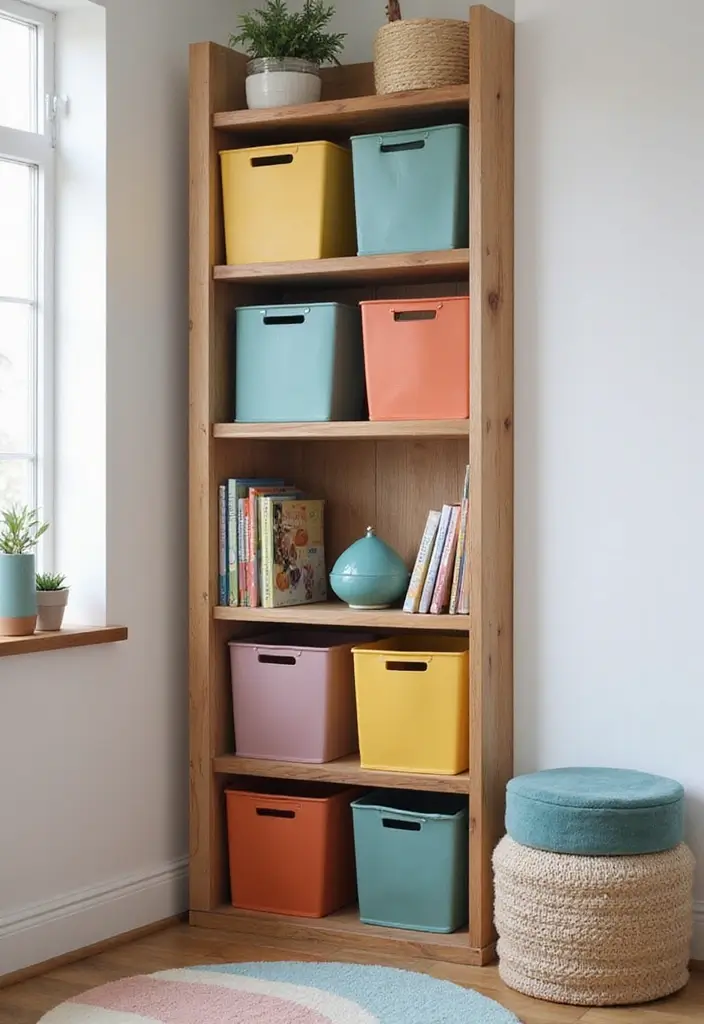
Corner spaces in small bedrooms sit empty far too often. A corner shelving unit can turn that nook into smart storage. Pick a unit that fits the corner and matches your room style, from clean, modern lines to playful shapes.
Here is why it helps. It frees floor space for play. It keeps toys and books within easy reach. It adds a friendly touch to the room that kids notice.
Considerations:
– Use a unit with 2 to 4 tiers to hold books, toys, and trophies.
– Add colorful storage bins to keep small items tidy.
– Top the unit with a few display items or trophies for character.
This setup makes a tidy display and a quick grab for everyday items. You’ll see everything at a glance, which makes cleanup feel doable.
Next steps:
– Measure the corner and the ceiling height to pick a shelf that fits well.
– Choose a shelf that suits the space; consider wall mounting for safety.
– Secure the unit to the wall with brackets or anchors.
– Fill shelves with labeled bins and books.
– Group items by use to create simple zones, like a reading corner near the bed.
Materials and styles vary. Wood, plastic, or metal each bring a different look. Rounded corners are safer for kids. Freestanding units work on carpet; wall-mounted shelves stay steady on busy days. Anchor the unit to prevent tipping, and keep heavier items on the lower shelves. Start with one corner unit and let the rest of the room grow around it.
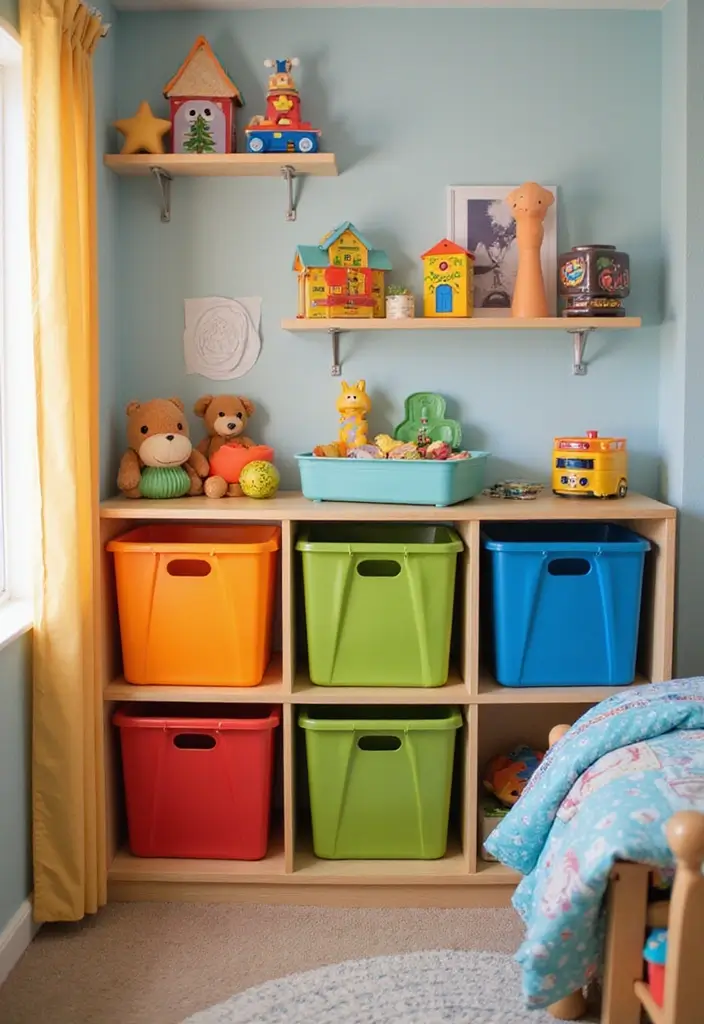
5. Clear Storage Bins on Open Shelves
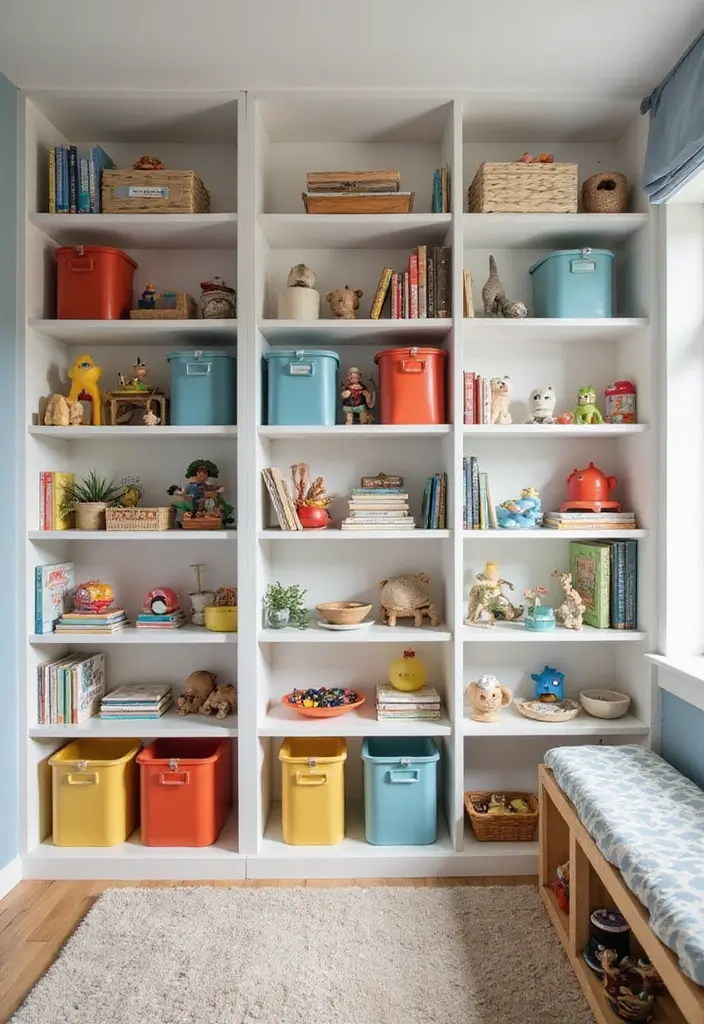
Clutter in a kid’s room can feel big. Clear storage bins on open shelves fix this fast. When you can see every toy, book, and game, cleanup becomes a quick, simple task. Your child learns where things belong, and the room looks calm and neat.
Benefits
– Easy to clean and rearrange.
– Kids grow more responsible when they can spot items quickly.
– The look stays clean and minimal, which fits many style rooms.
Tips to get the most from clear bins
– Use several sizes so you can fit tiny pieces and bigger items alike.
– Choose clear or frosted plastic so contents show without opening lids.
– Put items your child uses most on the lower shelf for easy reach.
– Label each bin with a small drawing or simple word to spark ownership.
How to set it up
– Pick sturdy, clear bins and a few extra lids.
– Group bins by toy type or by how often they are used.
– Place everyday items on the bottom shelf and seasonal items up higher.
– Keep a small label kit handy for quick updates as toys change.
Next steps and quick upkeep
– Wipe bins with a damp cloth every week.
– Involve your child in sorting day to keep the system fresh.
– Reorganize every few months to fit growing interests.
6. Themed Book Nook
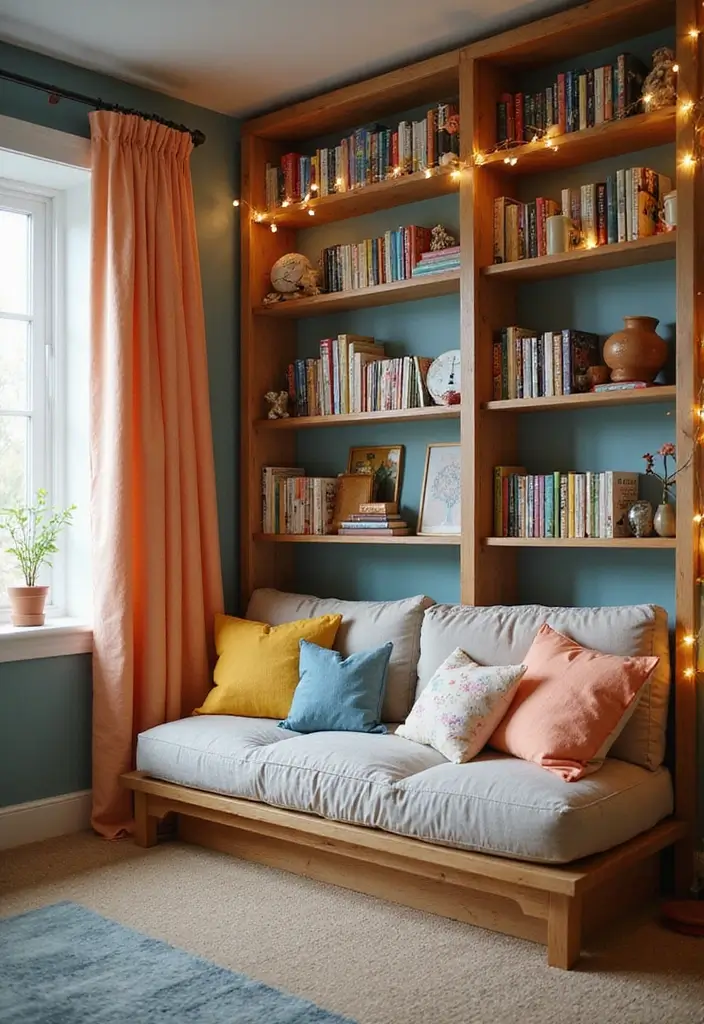
Want a cozy, magic corner kids can grow with? A themed book nook uses a small space to turn reading into an adventure. Start by picking a theme that matches your child’s interests—jungle, outer space, underwater world, or cozy forest. Then choose shelving that matches the vibe. Floating shelves, a tree-shaped tower, or low cubbies fit a tight space.
Here is why wallpaper or decals matter: they set the mood fast and hide plain walls. Use bright, kid-friendly patterns that fit the room. Next, add a soft seat. Plush cushions or foam pads create a comfy spot for reading. Light it up with fairy lights or garlands for a warm glow.
Ideas
– Put books at eye level on the main display shelf. This invites grabbing a title and starting a story.
– Add a small rug and a couple of soft cushions for a cozy reading zone.
– Include at least one themed prop, like a stuffed planet or jungle vines, to reinforce the theme.
This corner is more than storage. It sparks curiosity and daily reading. With simple steps, you’ll have a nook both you and your kid love.
7. Ladder Shelves for a Modern Touch
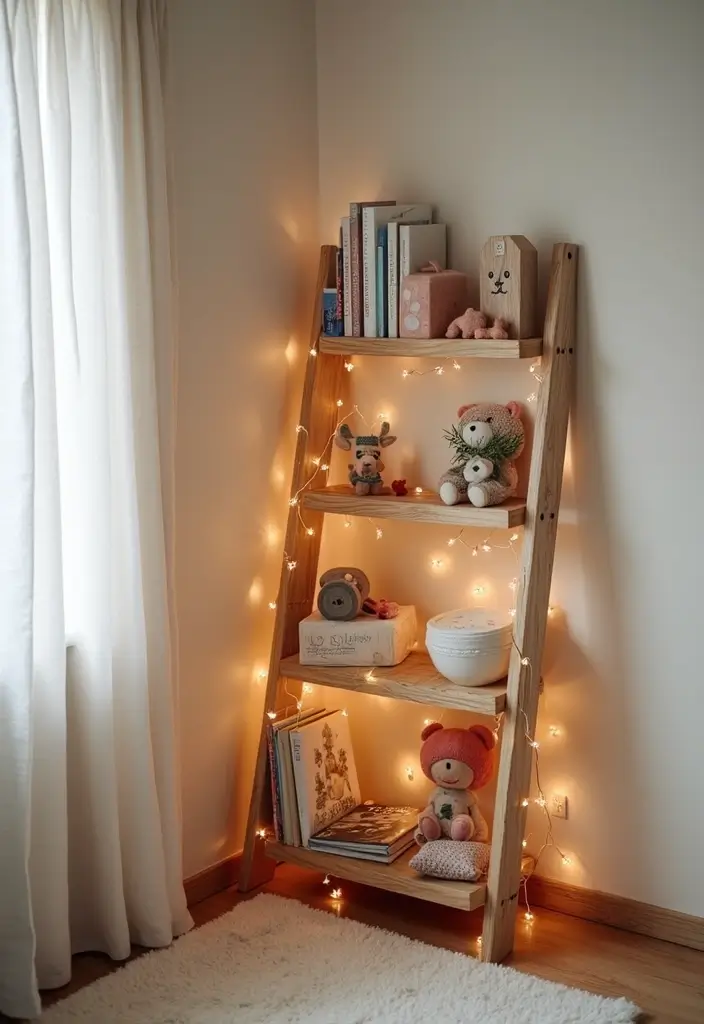
Want a clean, modern look in your kid’s room without losing space? Ladder shelves fit the bill. They lean against a wall and show off books, toys, and favorite decor. The open design keeps items easy to reach, so little hands can grab a book or plush without a search. They fit on most walls and use vertical space well.
Features:
– Light and easy to move
– You can drape fairy lights over the rungs for a warm glow
– Several tiers give spots for books, baskets, toys, and small plants
This style adds a fresh look while staying practical. Here is how to use it well.
Next steps:
– Pick a sturdy wall and test the shelf’s balance. If needed, anchor it.
– Put heavier items on the bottom steps, lighter ones up top.
– Create a small display with baskets, a photo, and a plant.
Style tips:
– Mix wood tones with a touch of metal to match the room.
– Wrap the ladder in soft lights for bedtime glow.
– Keep cleanup easy with labeled baskets.
Ladder shelves help the room feel calm and neat.
8. Under-Bed Storage Solutions
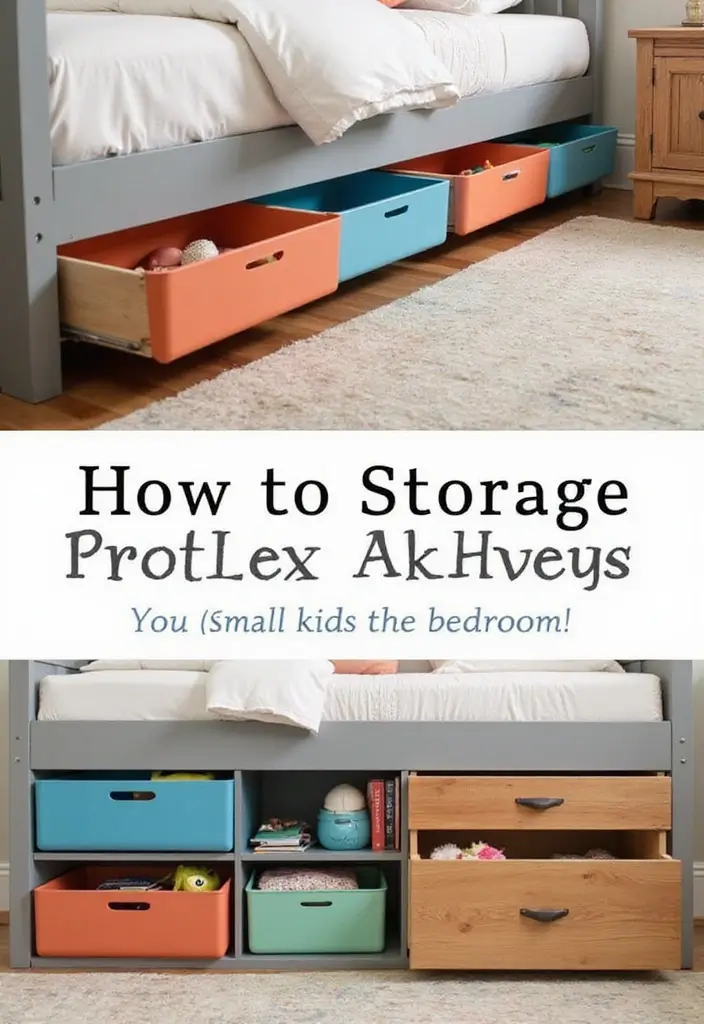
Stuck with too much stuff and not enough closet space? The area under the bed is a hidden gold mine. Rolling bins or shallow drawers slide in and out with little effort. They keep toys, clothes, and linens out of sight but close at hand. You can grab what you need in a snap, and your child can help clean up with a quick pull.
Benefits:
– Keeps the room tidy by hiding clutter.
– Easy for your child to reach and return items.
– Works well in small spaces without crowding the floor.
Here is why it works and how to set it up.
– Step 1: Measure the space. Check the bed height and the bin depth. Look for low-profile options that slide smoothly.
– Step 2: Pick the right bins or drawers. Try plastic with lids, fabric bins, or slim wood drawers. Color them to match the room so storage feels fun.
– Step 3: Sort first. Put seasonal clothes in one bin, extra linens in another, and larger toys in a third.
– Step 4: Label each bin. Simple words or pictures help your child know where things go.
– Step 5: Place and use. Slide the bins under the bed and teach your child a quick clean-up routine.
– Step 6: Check regularly. Once a month, pull them out, refresh, and move items as needed. Add a small lock to wheels if you worry about spills or tipping.
Tip: choose bins in bright colors to make storage feel playful, not dull.
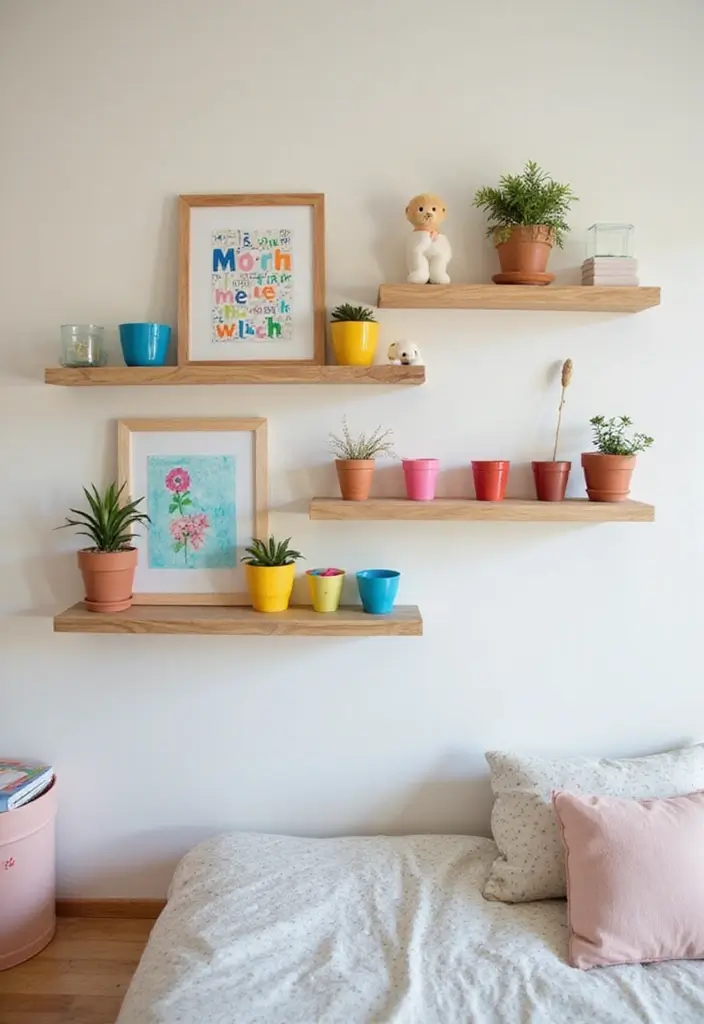
9. Personalized Wall Art Shelves
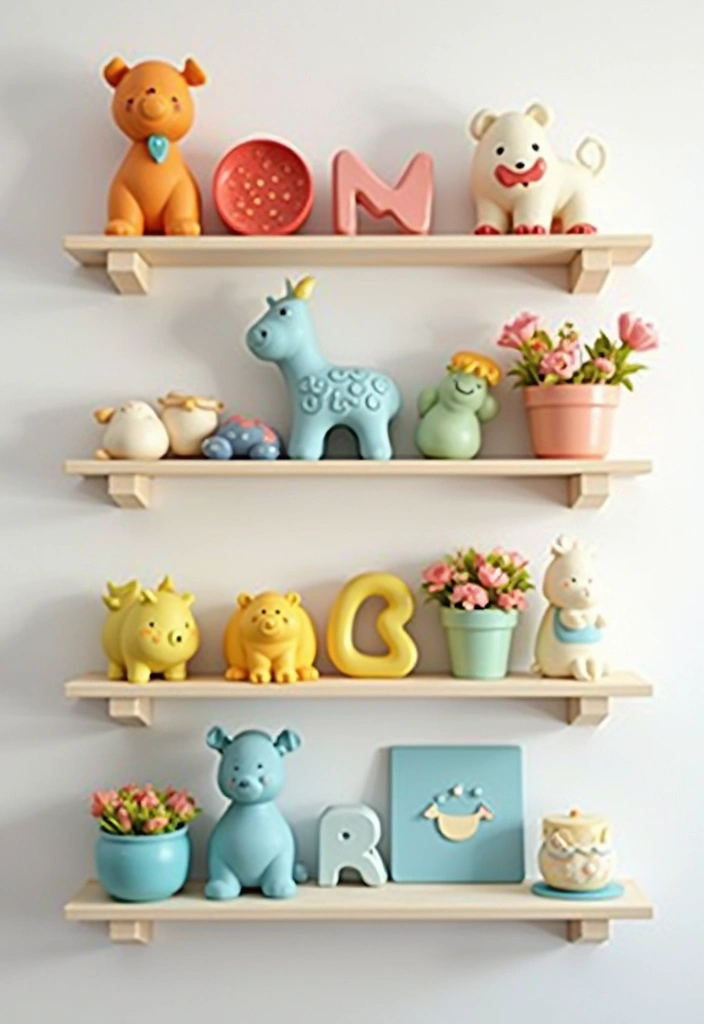
If your goal is to keep a kid’s room tidy without losing charm, personalized wall art shelves can be your answer. They pair storage with kid-friendly style. These shelves feel like part of the room, not just a box on the wall. You can show off art, books, and little treasures all in one place.
Why personalize wall art shelves
– They reflect your child’s interests with letters, shapes, or icons that spell out a name or favorite topics.
– They double as decor, so you see color, texture, and character every day.
– They make small items easy to reach and easy to put away, which means less clutter and more ownership for your child.
How to plan and pick materials
– Choose a shelf style that matches the room: floating boards, modular cubes, or a corner rack.
– Pick kid-safe materials: solid wood or sturdy plywood with non-toxic paint.
– Think about color and finish. A bold shade pops, while a soft tone blends in for a calmer look.
– Make sure the weight rating fits what you plan to put there, from books to keepsakes.
Next steps
– Decide what to display: name letters, favorite quotes, small framed art, or books.
– Gather supplies: mounting anchors, screws, a level, and painter’s tape for clean placement.
– Mount at a reachable height so your child can help.
Tips for daily use
– Rotate items monthly to keep the display fresh.
– Add a tiny book ledge for quick reads.
– Keep a few shelves for seasonal art to stay organized.
Safety and upkeep
– Use rounded edges and sturdy anchors.
– Clean with a damp cloth.
– Check screws every few months to stay secure.
Common questions
– How do I mount safely on a shared wall? Use proper anchors and level each shelf.
– What if space is tight? Try slim, vertical shelving or a corner model.
– How do I keep clutter from coming back? Plan a simple rotation routine and involve your child.
With these steps, you get stylish, practical, kid-friendly wall shelves that grow with your child.
10. Whimsical Animal Shelving
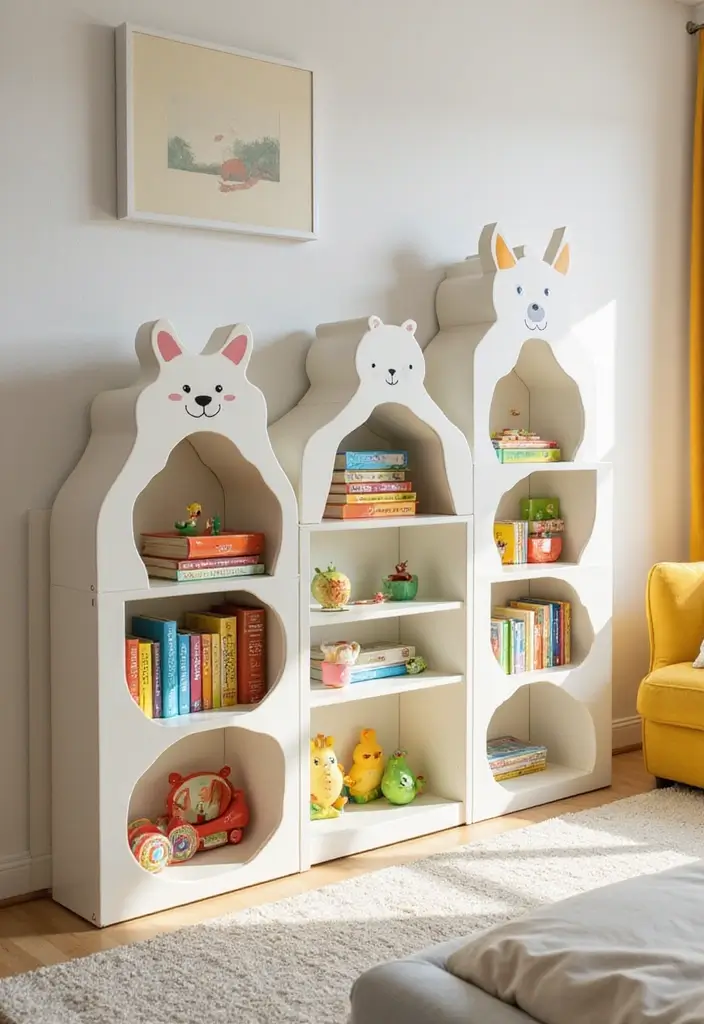
You want shelves that are fun and easy to reach. Animal shaped shelving can do both. Think of a giraffe with a tall neck for storage or an elephant with big ears that hold small items. These shelves add charm without making the room feel crowded.
Benefits:
– Encourages imaginative play. A book becomes a new adventure.
– Serves as both decor and storage. You get style and space in one.
– Comes in various materials, from wood to plastic. Pick what fits your room.
Here is why this idea works for you. It keeps books and toys organized while adding a playful touch your kid will love. It also gives you flexible display space for favorites and keepsakes.
How to choose the right animal shelf
– Material and build: wood is sturdy, plastic can be lighter, and metal packs a strong punch. Pick what fits your wall and budget.
– Size and weight: check the shelf’s weight limit. Make sure it can hold picture books and small toys.
– Safety basics: look for smooth edges and secure mounting. Use wall anchors if you hang over a crib or bed.
– Style match: pick an animal that fits your kid’s interests or the room’s color.
Placement and styling ideas
– Place shelves at kid eye level. Easy reach makes cleanup simple.
– Pair two animals for a mini gallery and more display space.
– Use the shelves for books on the lower levels and plush toys or keepsakes higher up.
– Tie in room colors by choosing a shelf in a matching wood tone or bright accent.
Next steps
Measure the wall, pick a design, and mount with proper anchors. Then invite your child to arrange books and toys. A little setup goes a long way toward order and fun.
11. Interactive Wall Shelves
Do you want wall shelves that do more than hold books? Use interactive wall shelves that invite play and tidy habits. Magnetic panels or a chalkboard finish turn a plain wall into a studio. Your child can attach magnets, draw a picture, or proudly display a favorite toy. This setup keeps the room lively and easier to clean.
Tips:
– Ensure the shelves are securely mounted.
– Combine different textures for a more engaging space.
– Rotate items regularly to keep it fresh.
Next steps: This setup helps kids see organizing as part of play. It sparks creativity and makes cleanup feel doable. You can swap items with the season or mood.
Here is a simple setup you can try:
1. Pick a reachable wall in the bedroom.
2. Choose a magnetic panel, chalkboard surface, or a mixed board with a slim shelf.
3. Mount with wall anchors that fit the shelf weight.
4. Add a few magnets, chalk sticks, clip rings, and a small basket for tiny toys.
5. Update the display every week to keep it exciting.
With these moves, kids learn to tidy without drama. The surfaces catch fingerprints and dust in a fun way, not as chores. You get a playful space that stays neat.
Interactive wall shelves do more than hold toys – they spark creativity and tidy habits! Transform your child’s space into a playful studio where organization meets fun.
12. Storage Benches with Shelving
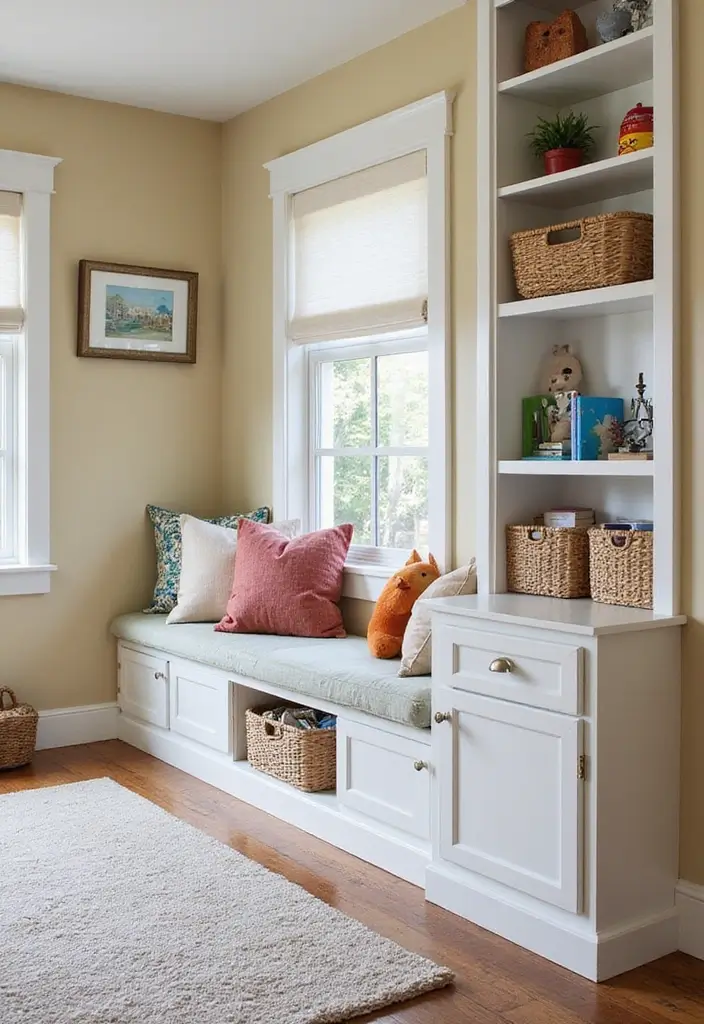
Struggling to fit seating and storage in a small kid’s room? A storage bench with shelving can fix both at once. It gives a cozy seat and keeps toys, books, and games neatly in reach.
Advantages:
– A comfy spot for playdates and quick reading breaks.
– Shelves put toys and books within easy reach for your child.
– You can style it to match the room’s theme with color and cushions.
Here is why this idea works well in real life. Your child can sit, sort, and reach what they need without moving around the room. The bench becomes a mini command center for cleanup time. Place baskets on the shelves for smaller items so the space stays tidy.
Next steps to try it in your kid’s room:
1) Measure the space and pick a bench with open shelving that isn’t too tall.
2) Choose sturdy wood or a strong composite and rounded edges for safety.
3) Add a soft, kid-friendly cushion and a few woven baskets or fabric bins.
4) Label bins with pictures to teach your child where things go.
5) Pick colors your child loves, then swap cushions over time to refresh the look.
Materials and finishes to consider:
– Wood options: pine, birch, or a painted MDF with a smooth finish.
– Fabrics: cotton or canvas cushions that wipe clean easily.
– Storage on the shelves: fabric bins, clear tubs, or labeled baskets.
– Safety tips: anchor the bench to the wall and use non-slip feet.
With these steps, you get practical storage and a welcoming reading nook all in one.
13. Multi-Functional Cube Shelves
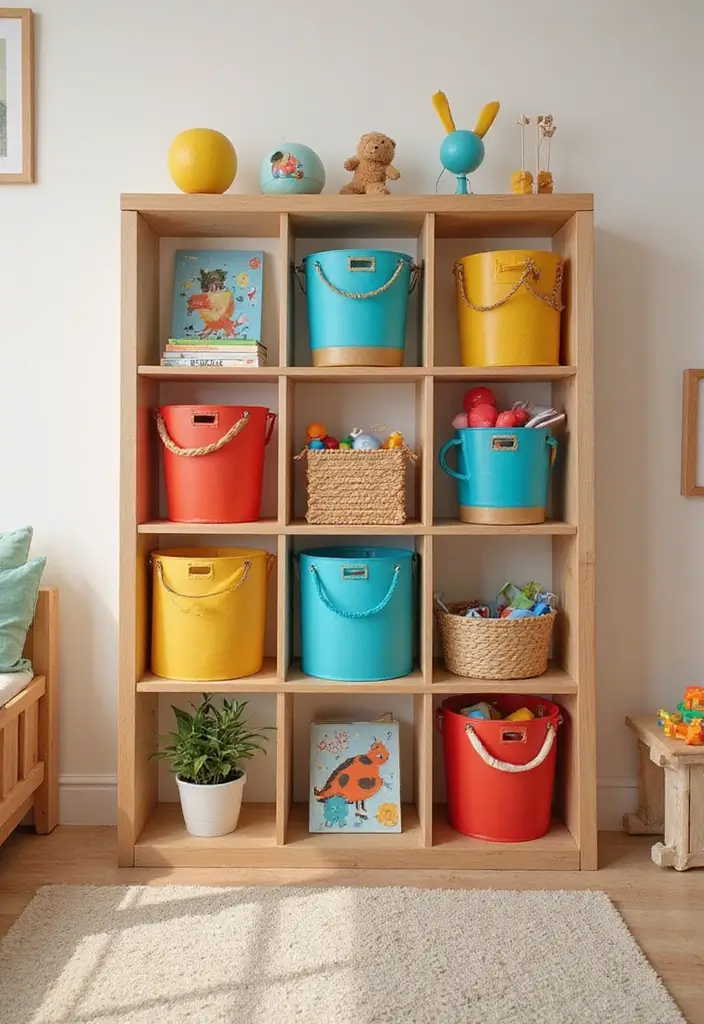
Need to organize a kid’s room without killing the fun? Try multi-functional cube shelves. These open cubes form a wall of storage that can grow with your child. They fit books, toys, and craft gear and show off favorites. Best of all, kids can reach what they need and learn to tidy up. They’re easy to wipe down, and you can use washable bins.
Why cube shelves work
– They are modular, so you can grow or rearrange as your child changes.
– Open fronts make favorites easy to see and put away.
– Color and texture keep the room lively.
Practical ideas
– Use bright fabric bins to hide small toys and keep surfaces clear.
– Arrange the cubes in a zigzag or staggered pattern to fit awkward corners.
– Top a unit with a soft cushion for a quick reading nook.
This setup invites kids to join in cleaning up and makes organization feel like part of play.
Safety and maintenance
– Choose sturdy wood or MDF with rounded edges.
– Anchor the unit to the wall to prevent tipping.
– Use bins with smooth rims and no sharp parts.
Next steps: measure your space, pick a low height, and add a few color bins to get started.
“Transform your kid’s bedroom with multi-functional cube shelves! They not only keep things organized but also make tidying up a fun part of playtime. Let creativity and order coexist!”
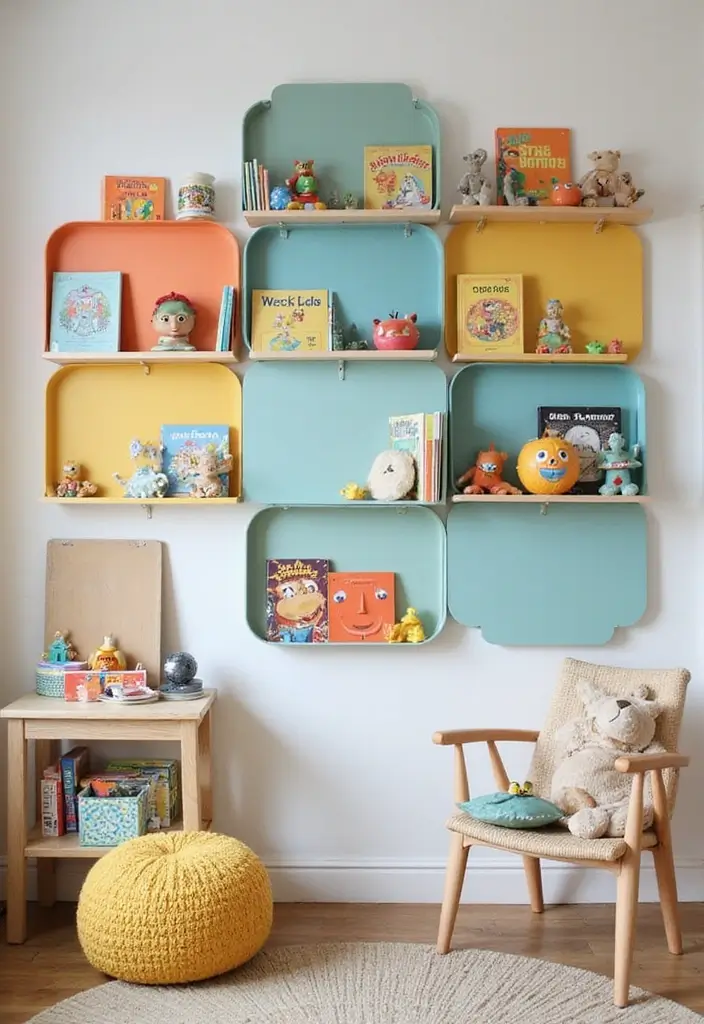
14. Vintage Suitcase Shelving
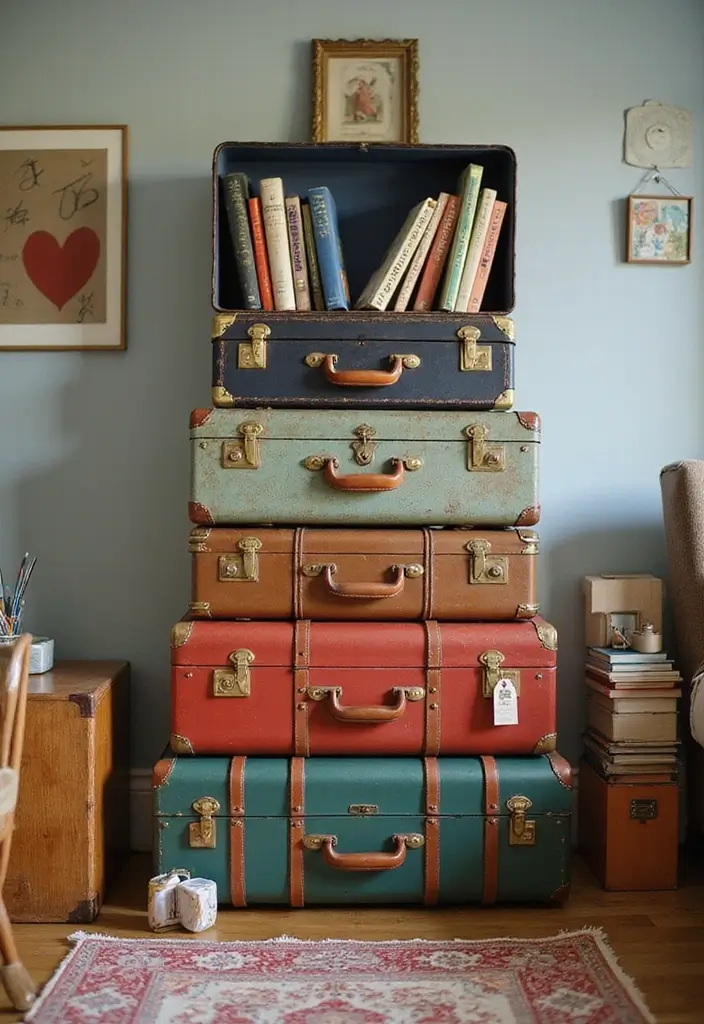
You want a storage idea that feels cute and keeps a room neat. Vintage suitcase shelving can do this. Turn old suitcases into little wall shelves. Stack them or mount them where you need storage.
Benefits:
– Unique eco-friendly storage you can feel good about.
– A playful display that sparks imagination.
– Paint or cover them for a new look.
Here is how to set it up. Start with 2-4 suitcases of various sizes. Clean and dry them. Light sand and paint in kid colors, or wrap with fabric. Let the paint dry.
– Mount the heaviest first. Use sturdy brackets. Place others around it in a simple grid or fun zigzag. Leave space for big books.
You can use them right away. Put books, toys, and a plant on the shelves. Add simple labels so your child can sort.
Next steps: plan the layout, then gather suitcases.
A few limits to know: suitcases vary in weight. Don’t overfill. Check the wall and studs. This works best on sturdy walls with space to move.
This style fits kids who love travel stories and hands-on displays. It blends vintage charm with practical storage.
Tip: mix old suitcases with a few light ones for variety. If the wall is weak, skip heavy pieces or use lighter bags that still hold small items.
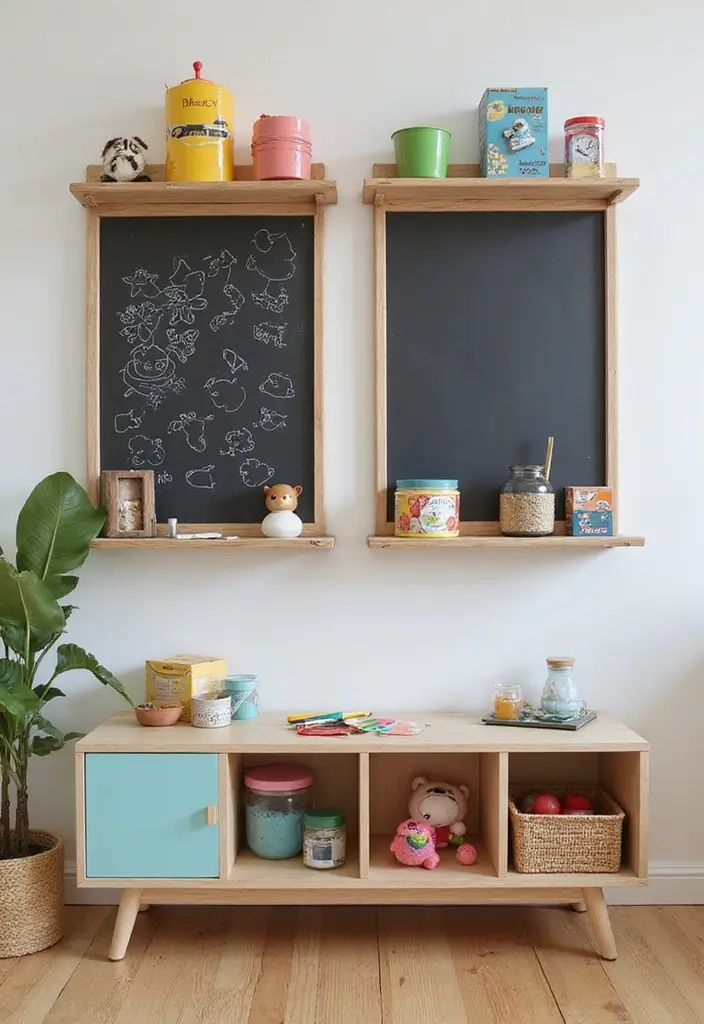
15. Chalkboard Shelving Units
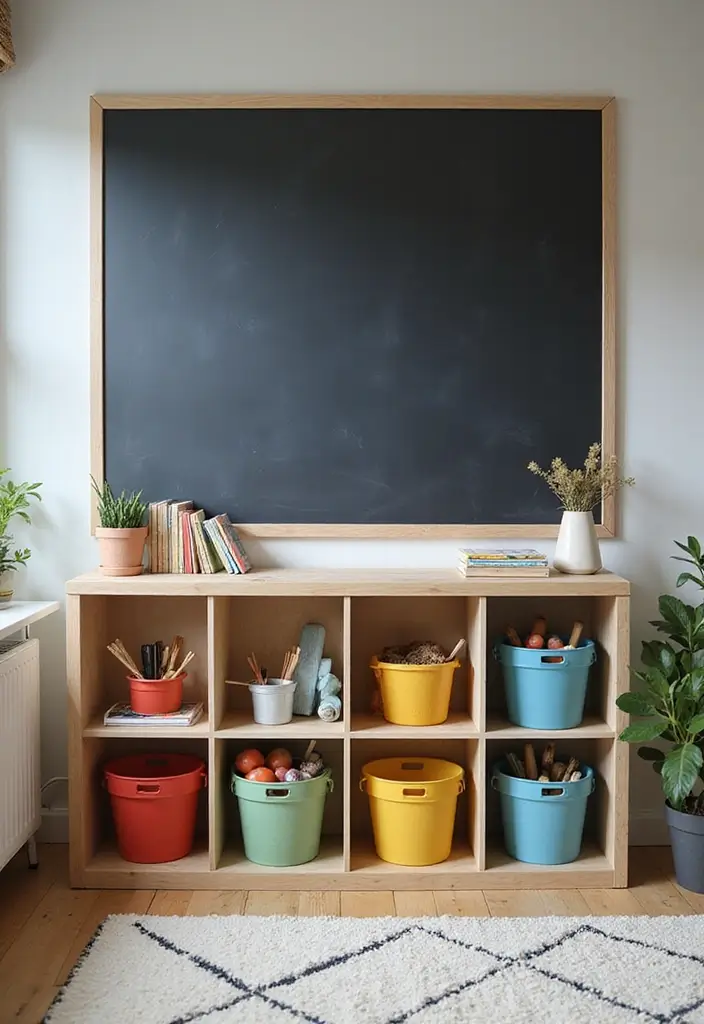
Are you looking for a storage idea that kids actually use and love? Chalkboard shelving units fit the bill. They give you space to stash toys and books while giving your child a surface to draw, label, or plan right on the shelf.
Benefits
– Easy reach: set the shelves at your child’s eye level so they can grab items without help.
– Colorful order: pair the shelves with bright baskets to sort small things like pairs of socks, crayons, or hair ties.
– Personal touch: a chalkboard front invites doodles, notes, and quick reminders that disappear with a wipe.
Choosing and using
– Pick sturdy wood or strong MDF that can handle daily use.
– Decide between a chalkboard paint surface or a ready-made chalkboard panel.
– Keep height safe and stable by anchoring the unit to the wall.
Next steps
– Mount the shelves at kid height and secure them to wall studs.
– Add light, easy-to-lift baskets to hold loose items.
– Keep a small chalk set nearby and create a simple rule: wipe the board after play.
Maintenance and styling
– Wipe the chalkboard surface with a damp cloth to erase marks.
– Use dust-free chalk for less mess and easier cleaning.
– Mix these shelves with other styles to match the room and keep things fresh.
16. Space-Saving Wall Hooks

You want a room that stays tidy without cramming the floor. Space-saving wall hooks can help. They add a playful touch while keeping items off the carpet.
Benefits:
– Save wall space by using vertical spots instead of cluttered shelves.
– Encourage your child to hang up bags, hats, and plush toys.
– Pick hooks in fun shapes like animals or stars to match the room theme.
Here is why they work well with shelves. Hooks give small, easy spots for quick items. They keep toys and gear reachable, so your child learns to put things away.
How to set them up for best results:
– Choose lightweight items to start, such as backpacks, coats, hats, or a favorite plush.
– Install hooks at your child’s eye level for easy reach and normal use.
– Mix hook colors or shapes with your shelving to create a little scene you both like.
Next steps:
1) Plan a simple layout near a closet or doorway.
2) Pick 4–6 hooks and a couple of shelves that fit your space.
3) Use proper anchors for the wall type and test each hook with a small item.
With these tips, the room stays neat and inviting. It feels easier for your kid to stay organized and take pride in the space.
17. Playful Wall-Mounted Cubby Shelves
You want storage that saves floor space and keeps a kid’s room tidy. Wall-mounted cubby shelves do that. They hold toys, books, and art supplies, turning blank wall space into a small display area for kids’ bedroom storage and room organization.
Ideas:
– Let your child pick what goes in each cubby. This simple choice makes the display theirs.
– Try shapes like circles or hexagons for visual interest. Use more than one size for a playful rhythm.
– Keep essentials at eye level for easy access.
Pattern and color matter. Arrange cubbies in a neat grid, a step pattern, or a curved wave to fit your wall. Choose materials you like, such as smooth wood, painted MDF, or bamboo, for a warm feel. Paint or stain to match the room’s theme, from pastels to brights.
These shelves do more than store. They become a part of the room’s decor and spark creativity. Kids see their items on display and get ideas to tidy up after play. Next steps: measure the wall, pick a size, and finish. Install at a height that suits your child, and add labels or color dots for easy grouping. With a simple install, you cut mess and gain space.
18. DIY Pallet Shelving
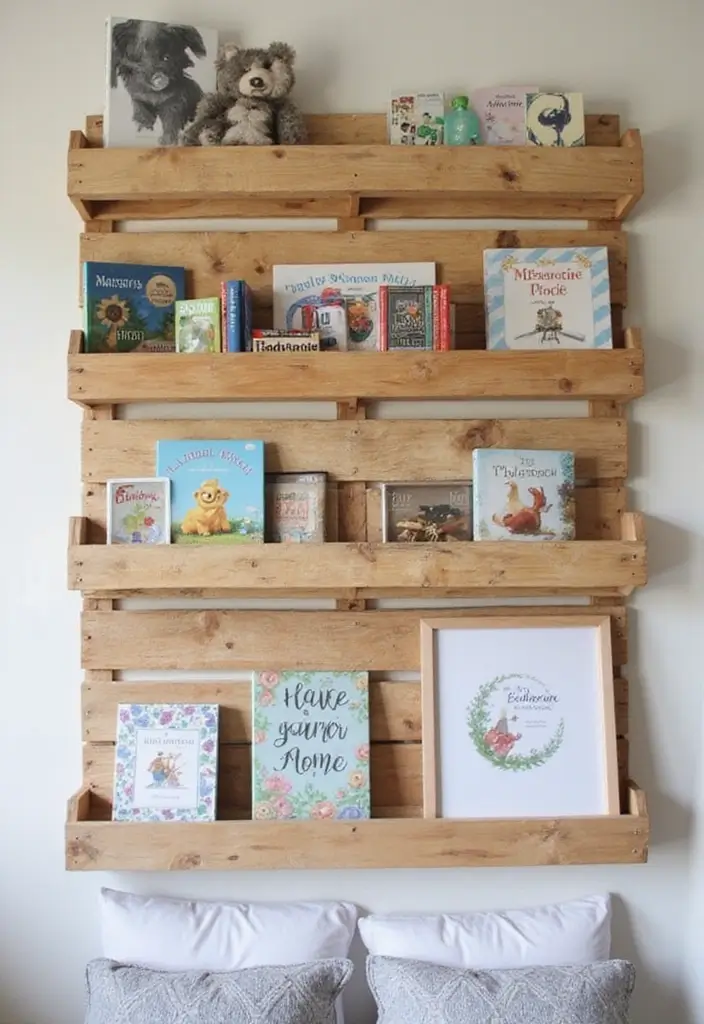
You want shelves that are cheap, cute, and safe for a kid’s room. DIY pallet shelving can do it. A repurposed pallet adds warmth and a rustic vibe. You can paint or stain it to match any color scheme.
Features:
– Cost-friendly and eco-minded
– Easy to adjust height and length
– Great for books, art, and small treasures
Here is why this approach helps you. It uses what you already have and cuts clutter fast. It also teaches kids how to care for their space in a simple way.
Let’s break it down. First, pick a clean pallet. Remove loose boards and any nails. Sand the surface smooth so little hands don’t snag on splinters.
Next, choose a finish. Paint bright colors for a playful room, or stain for a natural look. Apply a child-safe seal so spills wipe off easily.
Then mount it. Secure the unit to wall studs with sturdy brackets or screws. A strong mount keeps books from tumbling. You can make a single long shelf or a stack of shorter shelves for a playful shelf wall.
Finally, add safety touches. Round sharp edges, use edge guards, and place heavier items lower.
Next steps: involve your child in choosing colors, testing the fit, and decorating with art or storybooks. This keeps the room organized and full of life.
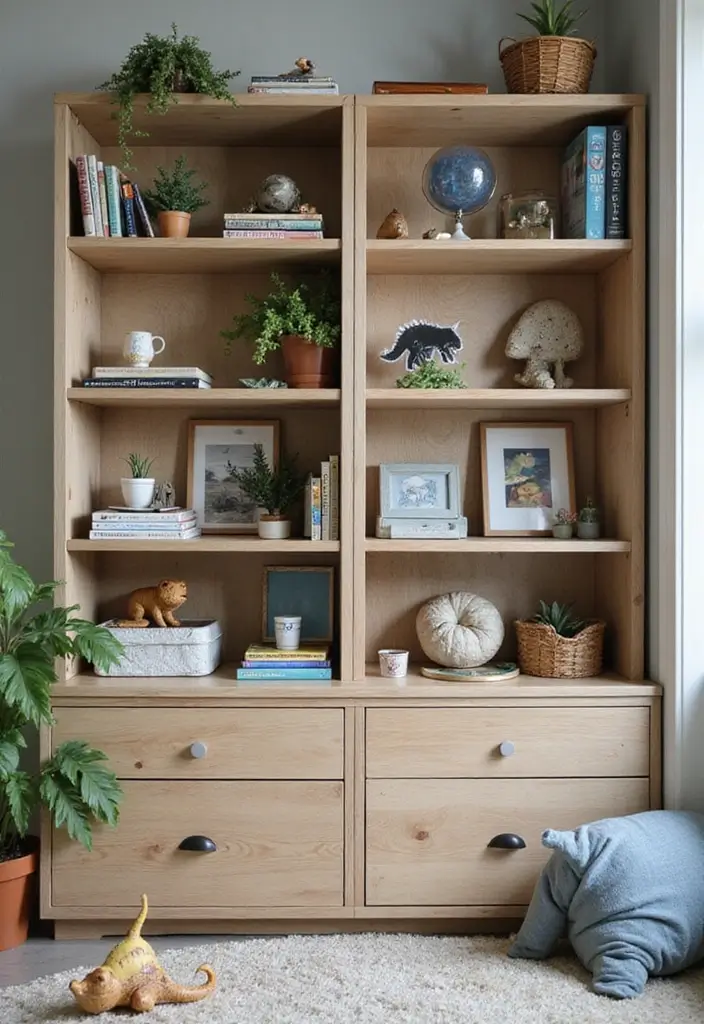
19. Tall Bookcases with a Twist
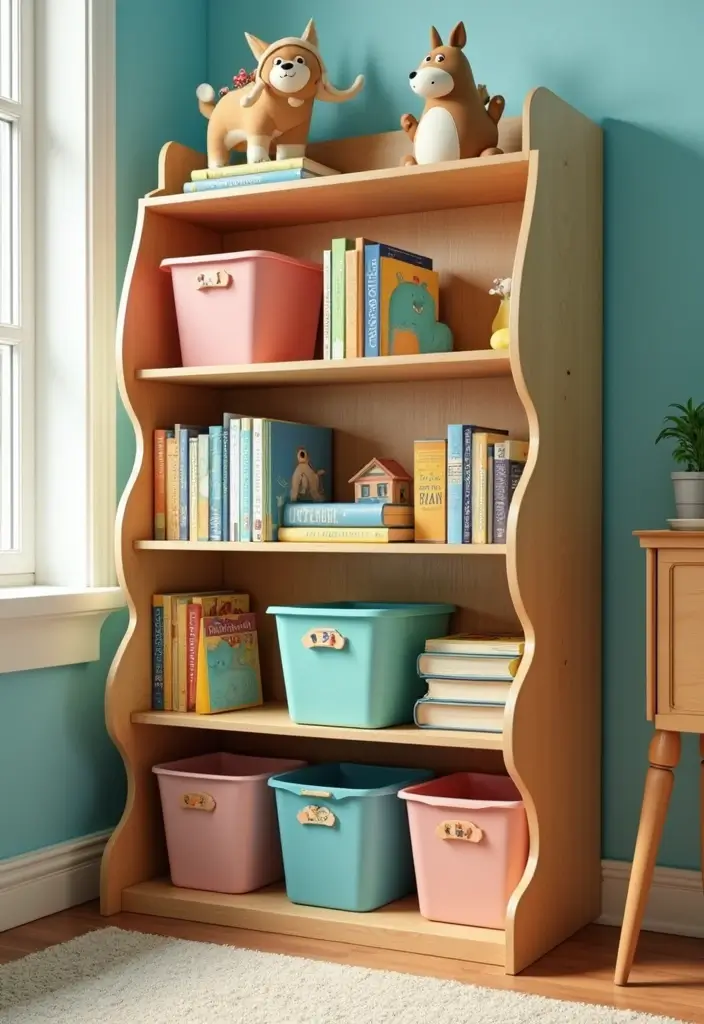
Looking to add big storage without crowding the floor? Tall bookcases give you lots of space up high. You can pick designs with fun shapes like zig-zag lines or a spiral spine. These shelves feel playful and still help you stay tidy.
Here is why this setup works. Vertical shelves use wall space first, so you keep the ground clear for playtime. Seeing everything at eye level or above makes it easy for kids to pick a book or toy.
If you share a room, pair a tall bookcase with a low dresser or desk for balance.
Tips:
– Secure the bookcase to the wall for safety.
– Fill the shelves with colorful bins and a mix of books to add character and grab-and-go storage.
– Use the top shelf for artwork or a small plant to draw the eye upward and celebrate their space.
When you choose these tall designs, you get a sturdy, kid-friendly feature that grows with them. It’s simple to swap out bins as interests change. And yes, some tidying up happens naturally because each item has a home.
Next steps: measure your wall, pick a style, and set aside a few minutes to anchor the unit. Your child gains a cool, organized spot for reading and display.
20. Modular Storage Systems
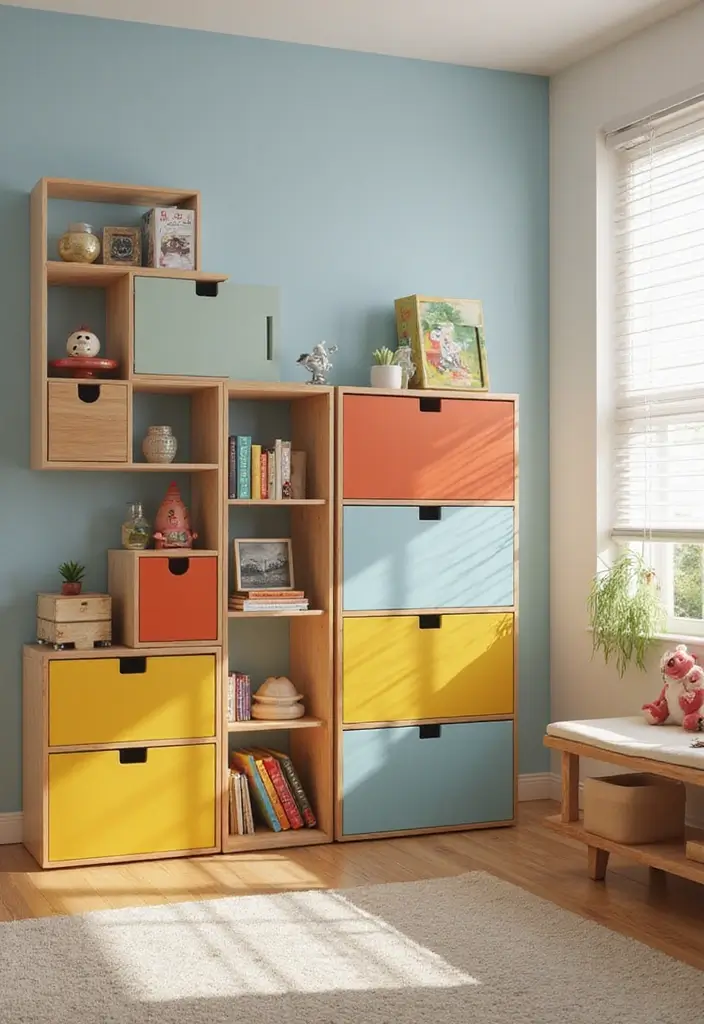
You want storage that grows with your child. Modular storage systems can keep pace as toys, books, and projects change.
Here is why they work
– Flexible units you can move on a wall or on the floor.
– A mix of colors and finishes to match your room.
– Some pieces double as seating or small tables.
What to look for
Choose a setup your kid can use easily. Open shelves help them see and pick. Labeled bins cut cleanup time. Look for sturdy frames in wood, metal, or tough plastic.
How to use them
Start with a low module your child can reach. Add drawers for tiny items and open shelves for favorite books. Keep a bin system for blocks and small toys.
Practical setups
– Create a reading corner with a small bench and shelves above.
– Put tall towers on one side for books and bottom bins for toys.
– Add a pullout drawer at eye level for daily items.
Tips to set up
– Measure the wall and plan for growth.
– Label bins so cleanup is simple.
– Choose pieces that wipe clean and stay sturdy.
Next steps
Walk the room, sketch a layout, and test it for a week. Swap pieces if needed and watch the space stay neat.
With the right setup, you save time and keep the room calm.
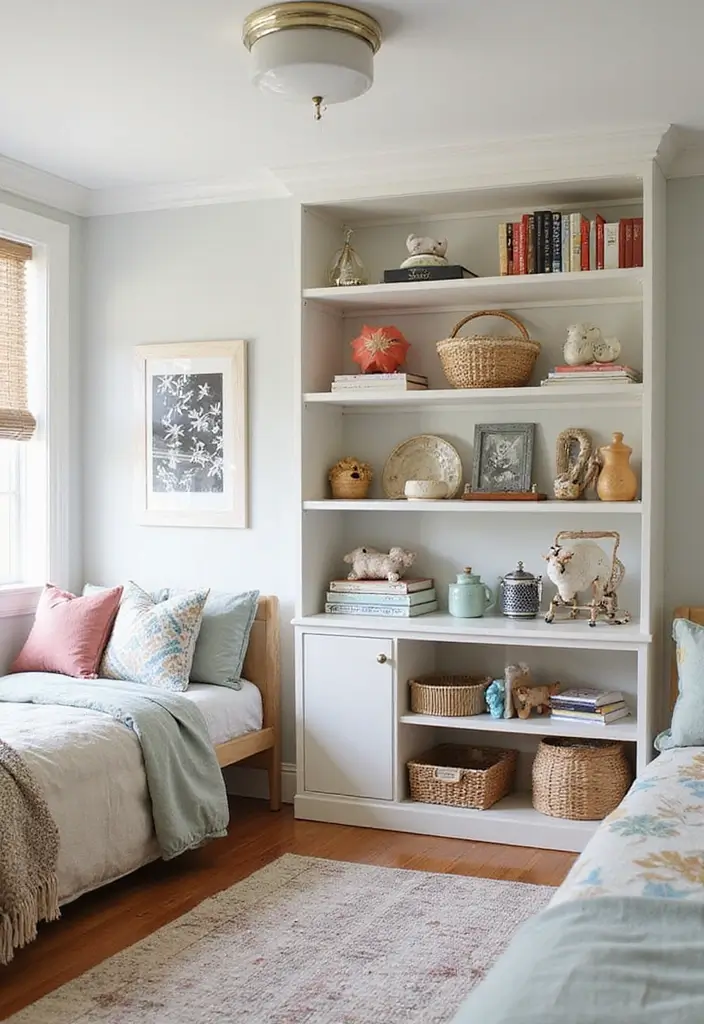
21. Themed Display Shelving
Themed display shelving helps your child feel the room is theirs. Start by picking a theme your kid loves—space, dinosaurs, fairy tales, or sports. A clear focus makes shelves feel intentional, not cluttered.
Here is why it works. Shelves show small treasures, not just boxes. It guides kids to place items where they can see them. It also makes it easy to rotate favorites as interests change.
– Practical setup ideas:
– Choose low, sturdy shelves in kid-friendly finishes like natural wood or bright colors.
– Put a wall behind the shelves in a matching theme color or a simple mural to tie the look together.
– Display tips:
– Line up books, small figures, and art along the ledges.
– Mix flat art with 3D items to add depth.
– Use labeled bins for blocks, small toys, or craft supplies so they become part of the display.
– Involve your child:
– Let them arrange new pieces after art time.
– Hang a few of their drawings on the wall above the shelves as a changing gallery.
Next steps: set a 15-minute, weekly rotation to keep the display fresh. This keeps items organized and makes the theme feel alive.
If you have tall ceilings, add a high shelf for tall toys and a low one for crafts.
22. Rotating Bookshelf
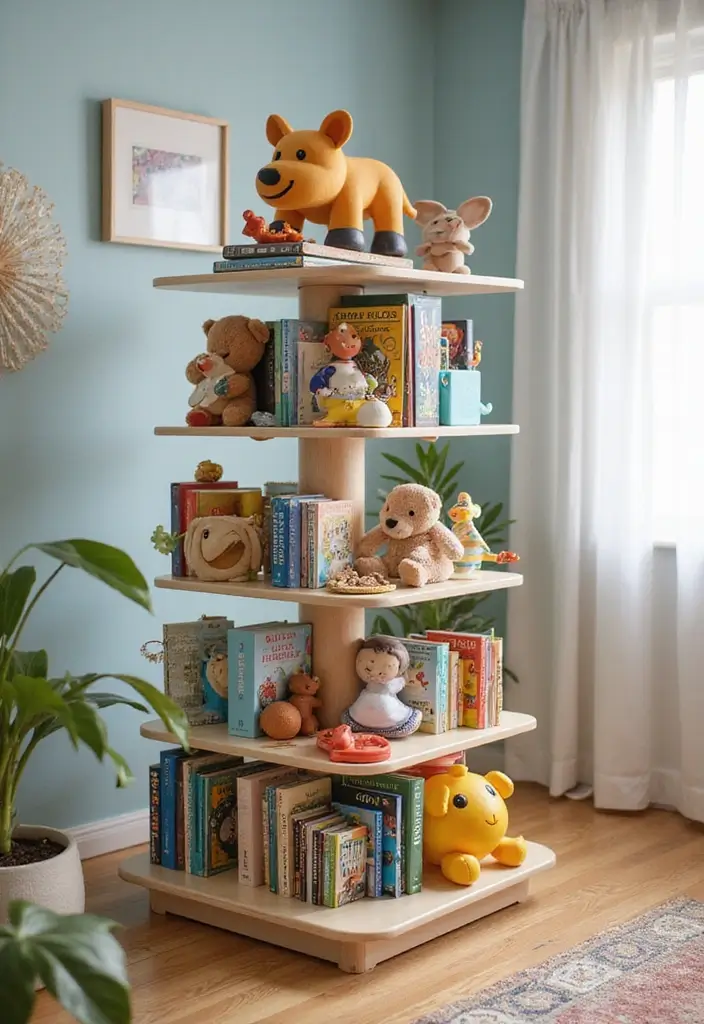
Looking to fit more books into a kid’s room without making a mess? A rotating bookshelf can solve that. It sits by a reading chair or in a corner and spins to reveal shelves at kid height. Your child can grab favorites quickly and keep the rest neatly in place.
Here is why this setup works: it stores many titles in a small footprint. The spin keeps all books visible, not buried in a pile. Children feel in control because they can choose, return, and restart their mini library with ease.
Advantages:
– Encourages independent reading.
– Space-saving and easy on the eyes.
– Serves as a fun room feature, not just a shelf.
How to pick and use one that lasts:
– Look for a unit with a smooth spin and a wide base for stability.
– Choose wood or metal with a sturdy finish, clear of sharp edges.
– If you can, mount it to the wall to prevent tipping.
– Place it where your child can reach the spines without stretching.
– Add simple labels or color dots on each shelf to cue where to put books.
– Keep a small basket at the bottom for reading props or bookmarks.
Next steps: measure your space, compare sizes, and pick a model that fits your style and budget. Then invite your child to fill it with stories for a cozy, organized corner.
23. Fun DIY Magnetic Shelves
Need an easy fix for clutter in a kids’ room. Magnetic shelves give a light, floating look and quick access to books and art supplies. If you choose magnetic paint on a wall or a small rail, items attach fast and stay put.
Ideas:
– Let kids hang their art in a lively, changing display.
– Use colorful magnetized containers for pencils, brushes, and tiny toys.
– Move items easily when a project ends or a new habit starts.
Here is why this setup helps. It keeps things tidy while letting kids rearrange as they wish. The system invites play and organization at the same time.
Next steps. Pick a wall section you can reach. Decide on magnetic paint or metal shelves that hold magnets. Install the paint or mount the rail with screws and anchors. Place strong magnets in each spot and test the weight with a few books first.
Keep it simple. Label a few containers so kids know where things go. Rotate displays to refresh the look. This approach blends art and storage and keeps things neat.
Want more color? Try wooden shelves with magnets. Always check magnets for loose parts. This setup grows with your kid. It stays easy to tweak.
24. Creative Drawer Systems
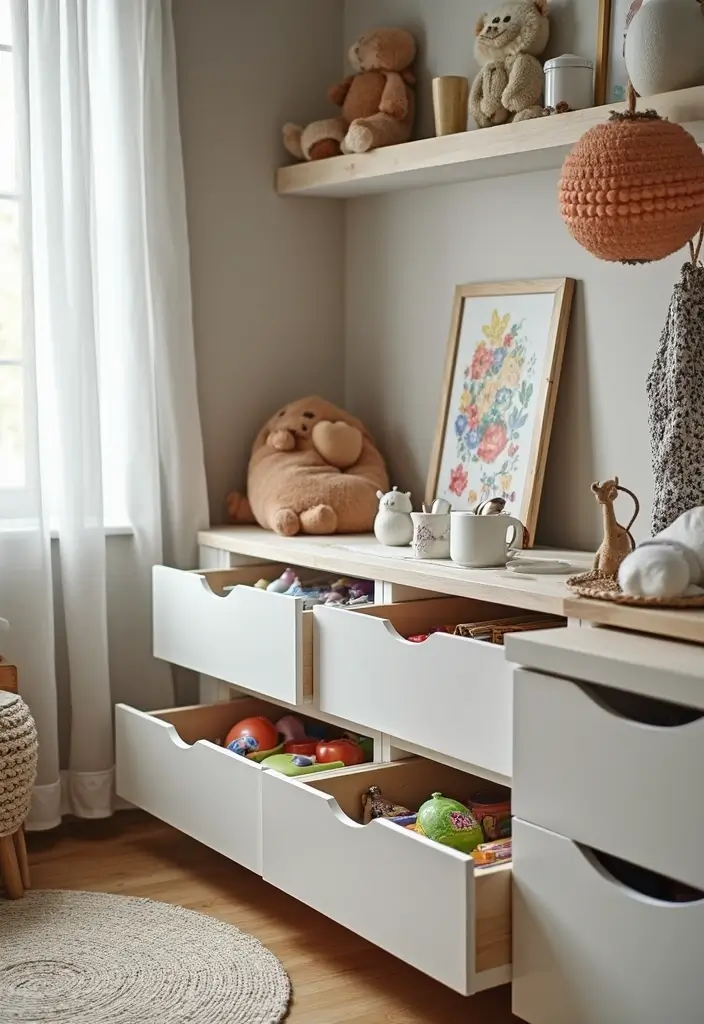
If you want a kid’s room that stays neat without nagging, a drawer system can help. Drawers tucked into a shelf or under a window mix storage with style. They hide art supplies, toys, and tiny keepsakes, so the room looks tidy even when it isn’t perfectly picked up. You get easy access and a smoother morning routine.
Benefits:
– Hides clutter while staying easy to reach.
– Fits into existing shelves or comes as a ready-made piece.
– Sparks a little excitement when a drawer opens.
– Lets you customize with colors and labels for quick finds.
Here is why this setup works. You see, drawers give you zones. You can store different items in separate sections. Under-window drawers make use of wasted space and keep the floor clear. You can mix deep drawers for big toys with shallow ones for art supplies. The result is a room that looks calmer and functions better.
Next steps:
– Pick a style. Wooden, white, or bright colors can match your shelves.
– Choose a size. Measure the tallest item you plan to store and add a bit of room to spare.
– Add organizers inside drawers. Dividers or small bins keep pencils, crayons, and stickers in place.
– Let your child help label and arrange. A little thinking, a lot of pride.
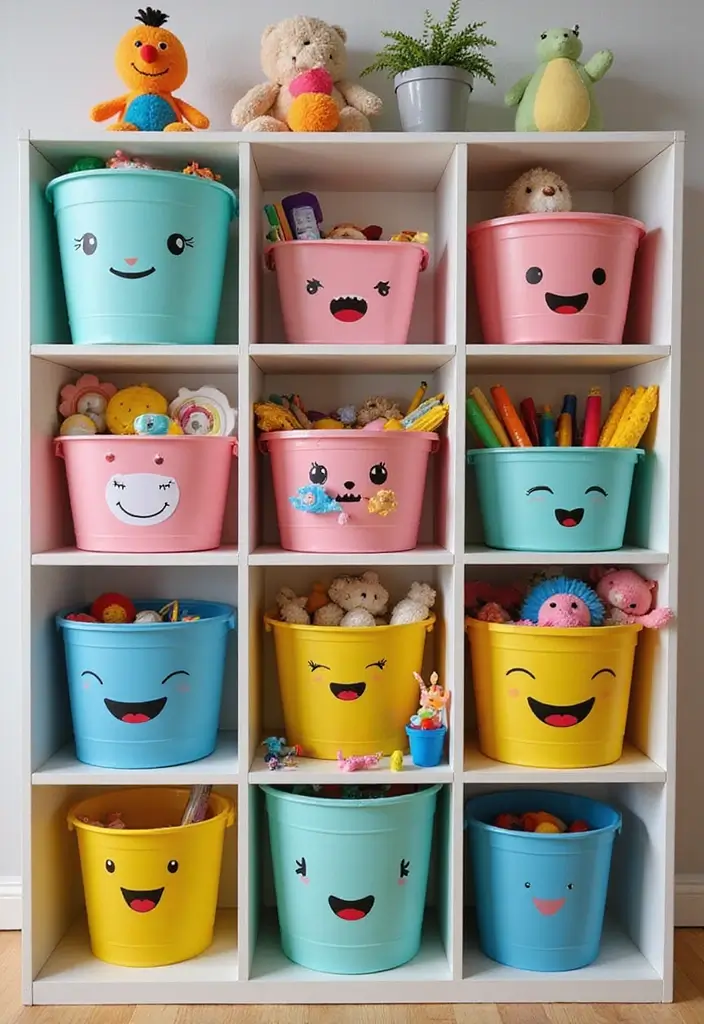
25. Colorful Toy Bins on Shelves
Colorful Toy Bins on Shelves
You want a room that stays neat without taking away the fun. Colorful toy bins cut clutter fast and add a friendly splash of color. They make storage easy for kids and help you see what’s where.
Here is why this approach helps. Labels guide little hands. Color helps kids choose what to put away. Stacking bins uses more shelf space.
– Pick 2 to 3 bin colors that match the room’s style.
– Keep the colors simple so it looks tidy.
– Label each bin with a word or a small picture.
– Use durable labels that stay on after playtime.
– Create a color map for quick sorting.
– Red bins hold cars, blue bins hold blocks.
– Stack bins to save space on the shelves.
– Put the most used items on the lower shelves.
– Use sturdy, kid-safe materials like hard plastic or fabric.
– Add a quick weekly reset.
– Ten minutes is enough to put toys away and restore order.
– Next steps: set up your shelves in a way that fits your space.
– Keep the look simple, and let kids help.
– This builds a habit and keeps the room tidy.
Clear bins help kids spot toys quickly. If a child can’t read yet, use pictures to label. Opt for light bins so little hands can lift them without strain.
26. Hexagonal Shelving
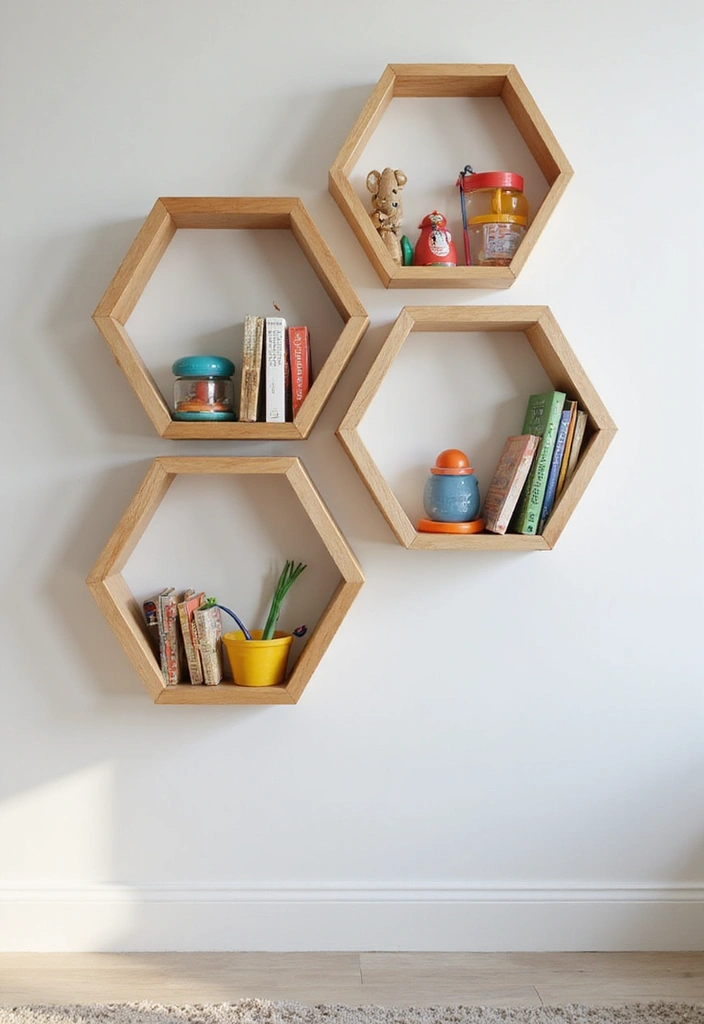
Looking for storage that keeps toys off the floor and looks stylish? Hexagonal shelves fit that need. Their honeycomb shape adds texture to the wall and makes display feel playful. You can rearrange them as your child grows.
Why hex shelves work
– They save space by sticking to the wall.
– They are modular, so you can build bigger walls later.
– They invite kids to pick favorites to show off.
Tips:
– Mix colors for a lively look.
– Use them to display toys, books, and small keepsakes.
– Cluster several together to form a honeycomb wall art.
– Keep finishes kid-safe and easy to wipe.
How to set them up
– Plan a layout on the floor first. Try a neat line, a loose grid, or a honeycomb cluster.
– Mount to studs with sturdy screws. Safety first.
– Place eye-level shelves where kids can reach.
Materials and care
– Choose wood or strong plastic shelves with rounded edges.
– Pick a non-toxic finish. Wipe with a damp cloth to clean.
Maintenance and ideas
– Check screws every few months.
– Rotate items to keep the display fresh.
– Leave space around the cluster so kids can play.
Next steps
– Start small with a three-hex cluster, then add more later.
– Sketch a quick layout, gather mixed-color shelves, and mount them safely.
– With care, your hex shelves stay neat and dreamy.
Hexagonal shelving not only keeps toys off the floor but also sparks creativity! Rearrange them as your child grows and watch their favorites shine in style!
27. Upcycled Furniture Storage
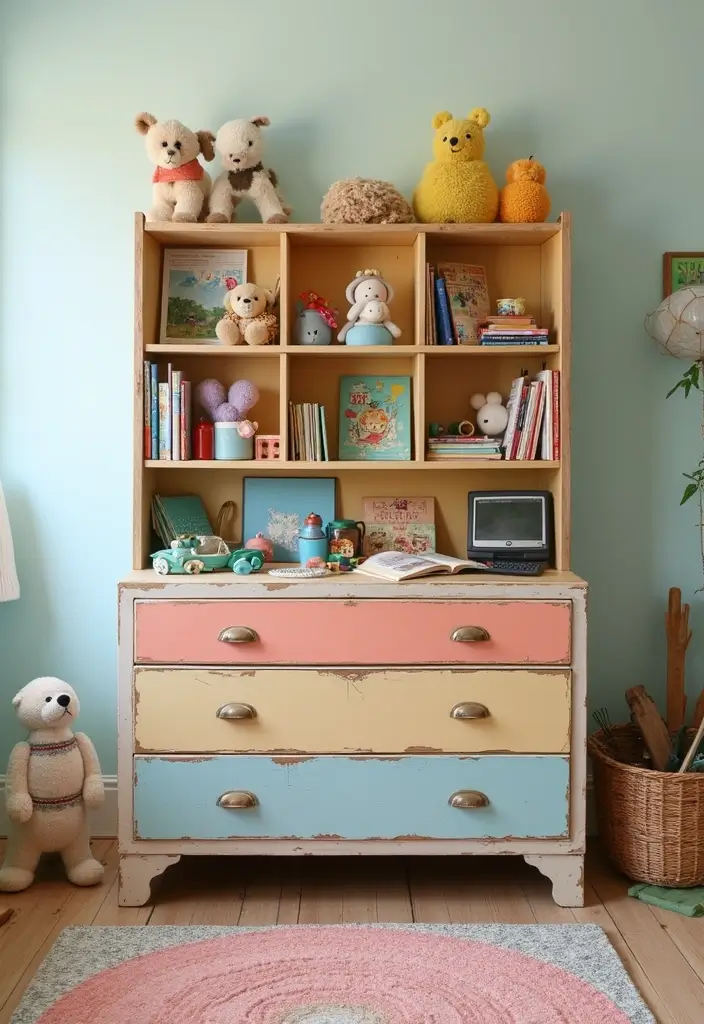
Trying to keep a kid’s room neat without buying new shelves? Upcycled furniture storage is a smart answer. A dusty dresser can become a handy shelf unit. You can remove some drawers or add simple boards to make open spaces. Paint it with bright kid-friendly colors, then add baskets for small items. Let your child help with the colors and stickers for a personal touch.
Benefits:
– Eco-friendly and budget-friendly.
– Lets you tailor storage to fit books, toys, and art supplies.
– Brings a unique look to the room that you control.
Here is why it works: it uses what you already have and grows with your child. You can add or remove shelves as needs change.
Steps to make it happen:
– Pick a sturdy dresser that fits the room style and sits flat on the floor.
– Clear it out. Remove drawers you don’t need and decide where shelves will go. If you want more space, you can swap drawers for solid boards to make extra shelves.
– Prep and paint. Sand lightly, wipe away dust, and apply a kid-safe paint in a color your child loves. Finish with a clear sealant to protect it.
– Add shelves and safety anchors. Mount boards where drawers were, or install small brackets. Secure the whole unit to the wall so it won’t tip.
– Outfit with baskets and labels. Use bins for small items and add a few name tags or pictures so your child can find and return stuff easily.
Next steps: set aside a weekend, gather supplies, and invite your kid to creative collaboration. You’ll gain storage that feels made for your home and for your child.
28. Glass Jar Displays
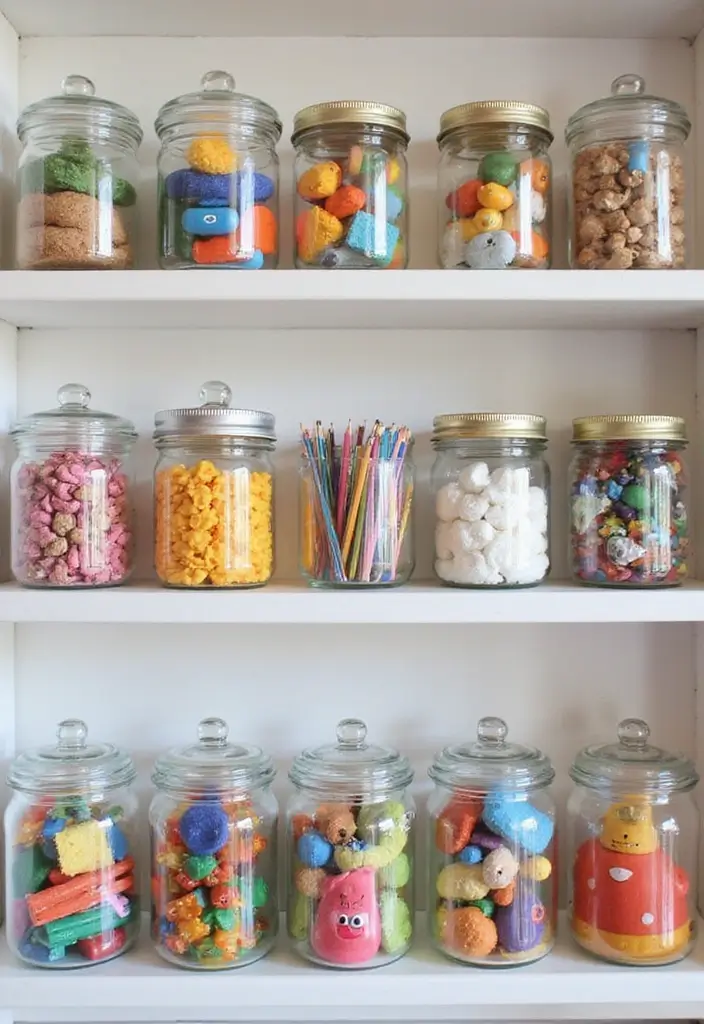
Struggling to keep small items tidy in a kids’ room? Glass jar displays offer a simple, friendly solution. Transparent jars show what’s inside, and their soft shapes feel playful rather than fancy. When you put tiny art supplies, beads, or little toys in jars, everything has a home. The result: a shelf that stays cute and organized.
What to do
– Label jars with fun tags or stickers. Use simple words or tiny pictures so your child can read them.
– Arrange them on open shelves for a clean, bright look. Line jars by height or color, and keep a small tray for lids.
– Choose colorful jars to add to the decor. Mix clear jars with colored lids, or pick jars in soft pastels. If you want a cohesive look, pick two or three colors and stick to them.
Why this helps
Kids can see what they need. They learn to put items back.
Materials and setup
– Jars: choose glass with wide mouths for easy filling.
– Lids and seals: metal or plastic lids that close tight.
– Shelves: sturdy wood or metal shelves at kid height.
– Labels: printable labels or stickers.
With these parts, you can swap items as your kid grows.
Give your child a small jar set and watch how fast they start sorting.
Glass jars aren’t just for cookies! They turn clutter into cute decor, giving every little treasure a home. Embrace playful organization with fun labels, and watch your kids’ room transform!
29. Modular Wall Panels
You want a kid’s room that stays neat and comfy. Modular wall panels give you flexible storage that grows with your child.
Why they work:
– They adapt as needs change. Add, remove, or move panels without a full redo.
– They add a personal touch. Pick colors, finishes, and textures that your child loves.
– They blend storage with decor. Shelves, magnets, and display spots feel like art on the wall.
Here is how to use them:
– Step 1: choose panels. Look for wood, cork, fabric, or magnetic surfaces. Some hold art, others hold notes or toys.
– Step 2: plan a simple layout. A grid keeps things tidy; a gentle stagger feels playful.
– Step 3: create zones. A low shelf holds plush toys; a middle shelf stores books; a top strip displays favorites.
– Step 4: involve your child. Let them pick a favorite item to place where it fits. It teaches care.
– Step 5: stay flexible. When your child grows, rework the setup.
Tips:
– Secure with proper anchors. For renters, use damage-free mounts.
– Rotate items every few months to keep the wall fresh.
Limitations:
– Upfront cost is higher than a single shelf.
– Some walls need careful mounting; check studs.
Next steps:
– Measure wall space and pick a starter set.
– Start with a 2×3 grid and add later if you want more.
30. Playful Storage Baskets
Toys tend to spread out fast. You want a room that is neat but still fun. Playful storage baskets make cleanup easy and inviting.
Here is why it works:
– Colors and patterns that fit the room theme make baskets feel like part of the decor, not clutter.
– Simple labels turn cleaning into a quick, kid-friendly habit.
– Stacking on shelves keeps everything visible and easy to grab.
– Fabric, plastic, or woven bins are easy to wipe clean and last long.
Practical ideas you can try:
– Pick a few basket styles that fit your space. Short, wide bins for small toys; tall baskets for stuffed animals.
– Put baskets on open shelves in the play area or near a dresser. It’s easy for kids to reach what they want.
– Use picture labels or small icons on the front to guide picking up.
– If you want a calm look, choose baskets in 2–3 colors that echo the room.
Next steps: measure shelf width, set a toy zone, and label the bins. This method lowers mess and adds a friendly touch to any kid’s bedroom. With a little practice, your child will help keep the space tidy and inviting.
Conclusion
Creating an organized and playful environment in your child’s bedroom is entirely achievable with these imaginative shelving ideas! Each concept invites creativity while ensuring that essentials are easily accessible. By involving your child in the design process, you can foster a sense of responsibility and pride in their space. Consider what resonates most with your child’s personality and let the decor reflect their vibrant world!
Let these charming shelving ideas inspire you to transform your child’s room into an organized, fun space that they will love.
Frequently Asked Questions
What Are Some Creative Kids Bedroom Shelving Ideas to Keep Things Organized?
If you’re looking to add some flair to your child’s room while keeping it organized, consider using floating shelves with a twist or animal-shaped shelving. These options not only save floor space but also add a playful touch that kids love. Stackable crates and corner shelving units are also fantastic for utilizing every nook and cranny of the room, ensuring that toys and books have a designated spot!
How Can I Incorporate Playful Storage Ideas in a Small Kids Room?
In a small kids’ room, maximizing space is key! Use under-bed storage solutions like rolling bins or shallow drawers to hide away toys and clothes. Modular storage systems can also adapt as your child’s needs change, allowing for flexibility. Don’t forget about colorful toy bins that not only brighten up the room but also make it easy for your little one to tidy up!
Are There Any Functional Bookshelf Designs That Fit a Playful Aesthetic?
Absolutely! A bookshelf with a playhouse design can serve as both a storage solution and a fun play area for your child. For a modern twist, consider a ladder shelf that leans against the wall, showcasing books and decor in a stylish way. These designs not only keep books organized but also encourage a love for reading in a fun and engaging environment!
What Are Some Tips for Organizing a Kids Room Efficiently?
Organizing a kids’ room is all about creating systems that work for both you and your child. Use clear storage bins on open shelves so everything is visible and accessible. Incorporate interactive wall shelves that allow kids to engage with their items. Remember to label everything so your child can learn where things belong, making cleanup a breeze!
How Can I Use DIY Ideas for Kids Bedroom Shelving?
DIY shelving can be both fun and functional! Consider making DIY pallet shelving for a rustic touch, or transform vintage suitcases into charming wall shelves. These creative projects not only save money but also allow you to customize the style to fit your child’s personality. Plus, involving your child in the process can make them more invested in keeping their room organized!
Related Topics
kids bedroom shelving
playful storage
small space solutions
DIY shelving
colorful decor
functional design
organized kids room
creative storage ideas
themed decor
budget friendly
clutter-free
easy organization