I put this together because sharing a bedroom is a common challenge for families. You want a space that feels calm, not cluttered. This post looks at ideas that fit real homes and real budgets. The goal is a room where siblings can sleep, study, and still play.
If you’re a parent or caregiver planning a room for two or three kids, this post is for you. You care about safety, durability, and a space that grows with your kids. You want ideas you can actually pull off without a full redesign. I keep things practical and easy to customize.
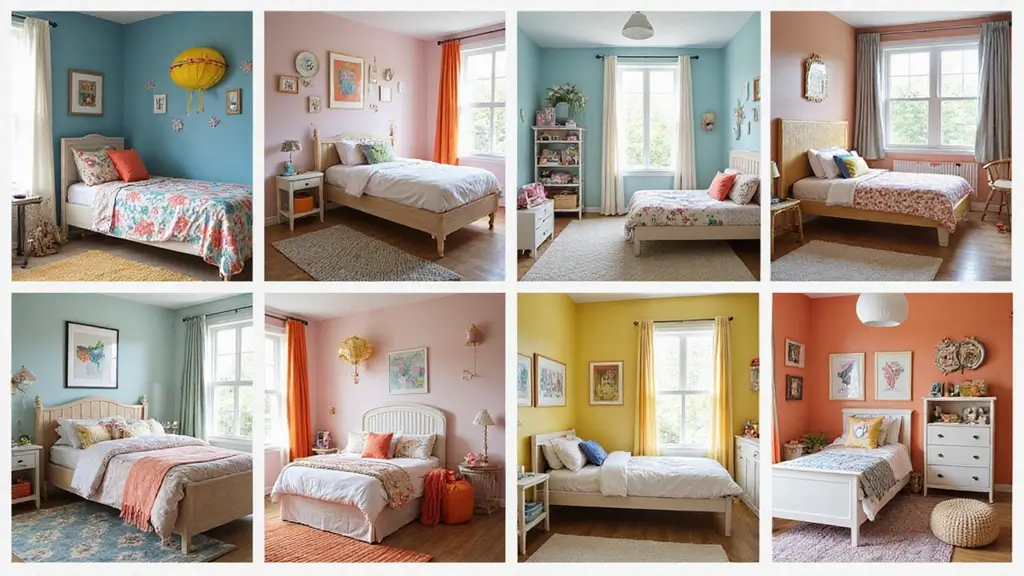
I pulled together 30 ideas that are practical and fun. They cover layouts, furniture, and clever storage. From bunk beds that leave room for a desk to shelves that hide toys and soft lighting ideas, you will find options that fit your floorplan. You’ll also see ideas in different themes and color schemes so you can pick what fits your home.
Here you will get zone ideas for sleep, study, and play. Learn how to choose durable furniture, easy-clean fabrics, and safe finishes. I share budget-friendly upgrades and smarter placements that make a small room feel bigger. These ideas are easy to adapt as kids grow.
No room fits all. Measure your space, note ceiling height, and think about how the door swings. Pick a starting point, like one bunk or a study corner, and build out from there. If you try a theme, keep it flexible with removable decor and washable fabrics.
Ready to dive in? Start with a quick floor plan sketch and list two ideas you like best. Test those ideas this weekend, then refine what works. If you want, share your layout in the comments and I can help with tweaks. I hope these ideas help you create a shared space that feels like each kid has their own corner.
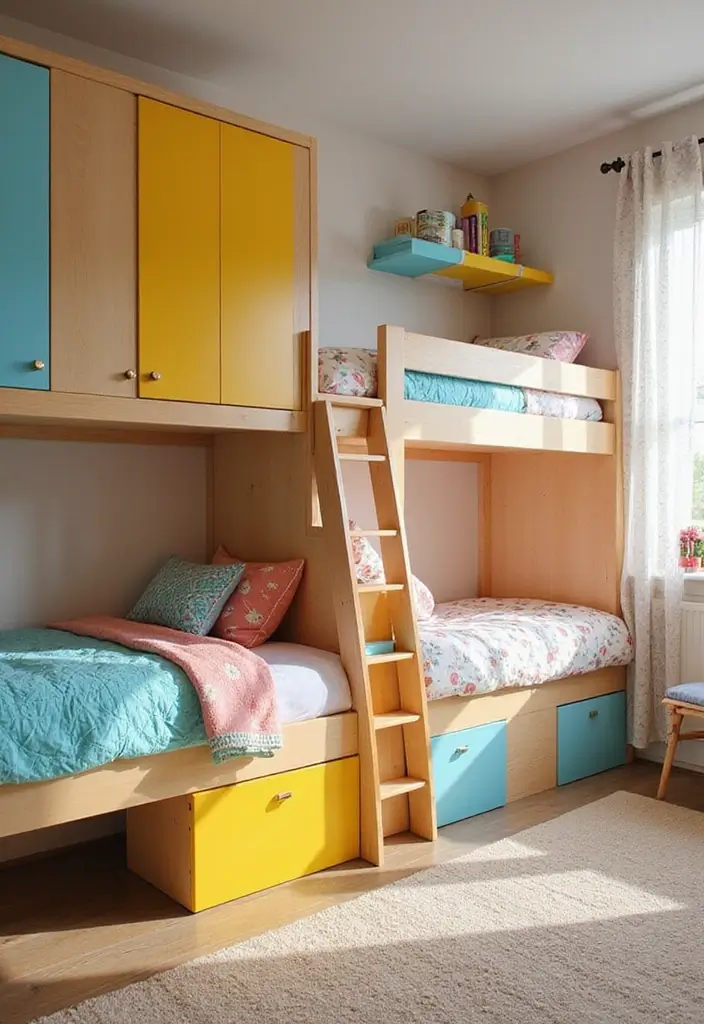
1. Bunk Beds with Storage
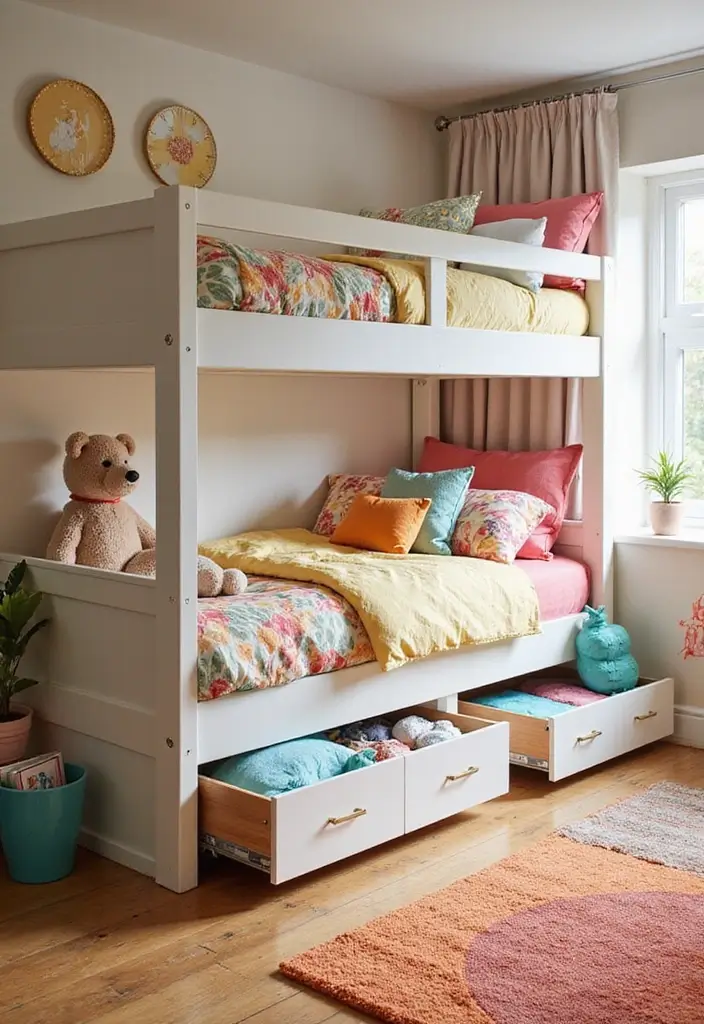
Here is why this setup helps a shared room. A bunk bed with built in storage or a loft that leaves room for a desk gives you two sleeping spots and a tidy shelf of drawers. You still have space for a reading corner or a small table. It feels like a tiny adventure each night, and the built in drawers hide clothes, games, and books.
Benefits of bunk beds with storage
– Space saver: It frees floor space for play and study.
– Fun factor: Kids love climbing to the top and calling it a bed “camp.”
– Styles: Wood, metal, traditional, or modern. Pick a look that matches your room.
Choosing and safety tips
– Check ceiling height so you can sit up without hitting the ceiling.
– Add sturdy rails on the top bunk for safe sleeping.
– Use a solid ladder and keep it secure.
– Place a soft rug under the bed for quiet landings.
What to look for when shopping
– Built in drawers or a desk underneath for extra storage.
– A strong frame, good weight limits, and rounded edges.
– Easy to reach bins and labels to keep items organized.
Practical setup ideas
– Label bins by category to make cleanup quick.
– Place a night light near the top bunk and a small shelf within reach.
– Slide a slim storage tower beside the bed for extra space.
Next steps: measure your room, compare styles, and choose a bunk that fits your ceiling and your kids’ needs.
2. Themed Decor
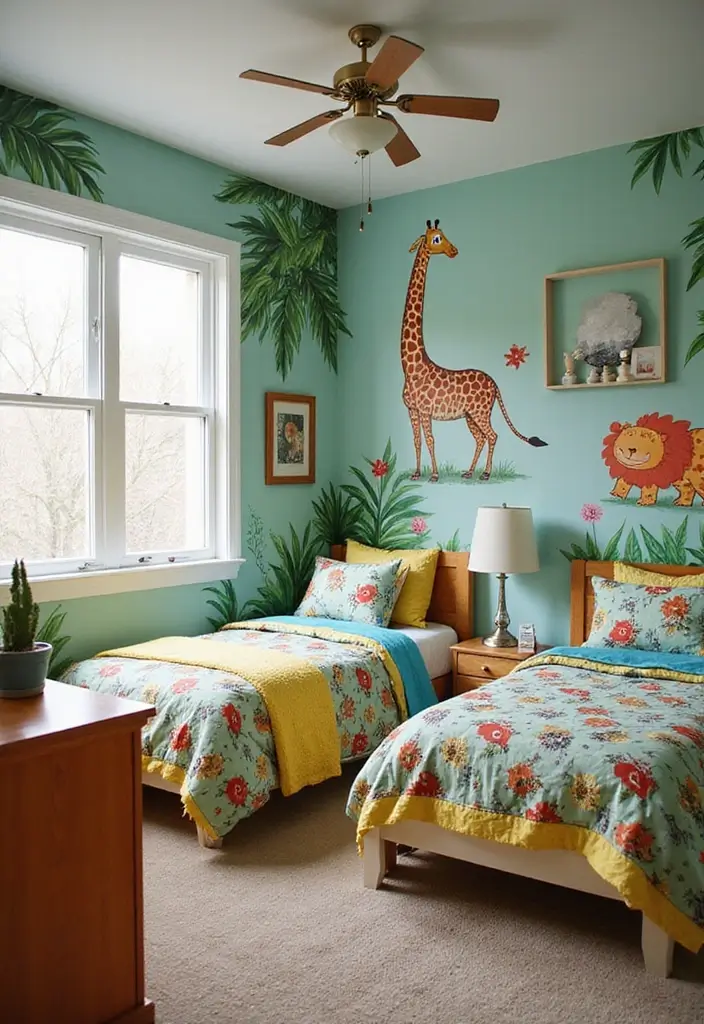
Themed Decor
You want a shared room that feels special. It should be easy to update. A clear theme helps you get there fast. Pick an idea your kids both like. Jungle, space, or a princess castle work. Start with bedding and wall colors that echo the theme. Then add accents like wall decals, a bed canopy, or a themed rug.
Tips for themed decor:
– Involve the kids by asking for ideas and letting them vote on options.
– Balance is key. Mix elements from each child so both feel seen.
– Rotate elements. Use removable wall art, swap pillow covers, and change bedding to refresh the look.
This approach sparks imagination and makes the room a shared place both kids love.
Practical ideas you can use now
If you’re unsure where to begin, try these doable themes:
– Jungle adventure: olive walls, palm decals, animal cushions, a light canopy over the bed.
– Space explorer: navy walls, star stickers, glow planets, a rocket lamp, a galaxy rug.
– Princess castle: soft pink tones, gold accents, a sheer canopy, crown pillows, a pretty rug.
– Ocean journey: sea blues, fish decals, turquoise curtains, a wavy bedspread.
Tips on setup: choose sturdy, removable items and keep cords tidy. A simple swap now can keep the room fresh for years.
Create a magical space for your kids with themed decor! A shared room filled with their favorite adventures fosters creativity and bonding. Let them help choose the theme and watch their imaginations soar!
3. Under-Bed Storage Solutions
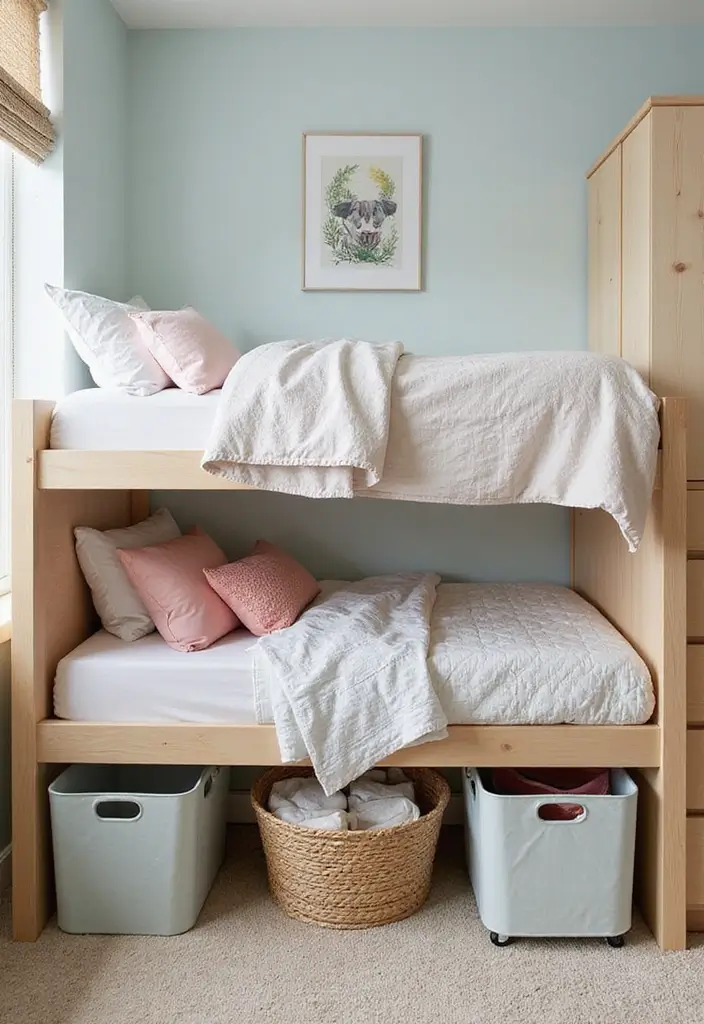
If your kids share a room, space can feel tight fast. Toys spill from boxes and clothes pile on the floor. Under-bed storage is a smart fix. It keeps items close but hidden, so the room stays calm. You get more room to move, and kids learn where things live.
Here is why it works: it uses space most rooms forget, it stays out of the way, and it shows kids how to tidy up.
Storage ideas include:
– Clear bins: See inside, so kids know where things go.
– Baskets: Soft fabric baskets pull out easily for quick cleanups.
– Shoe organizers: Great for small items like art supplies or books.
This setup also helps you keep the floor free, so you can play and move around more easily.
Next steps:
– Measure the space under the bed to know what fits.
– Pick 2 to 3 rolling bins or a slim under-bed drawer set that slides smoothly.
– Label lids or fronts and keep a simple rotation for toys, clothes, and art supplies.
Tips to keep it tidy: wipe bins with a damp cloth, and keep dust out with lids.
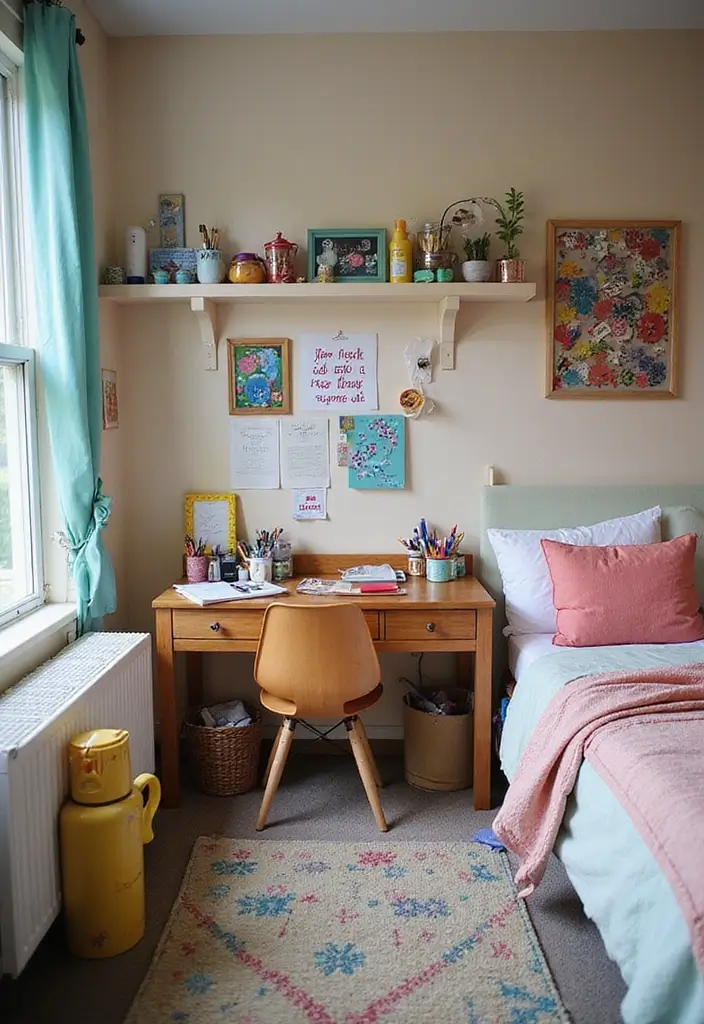
4. Dual Desks for Homework Time
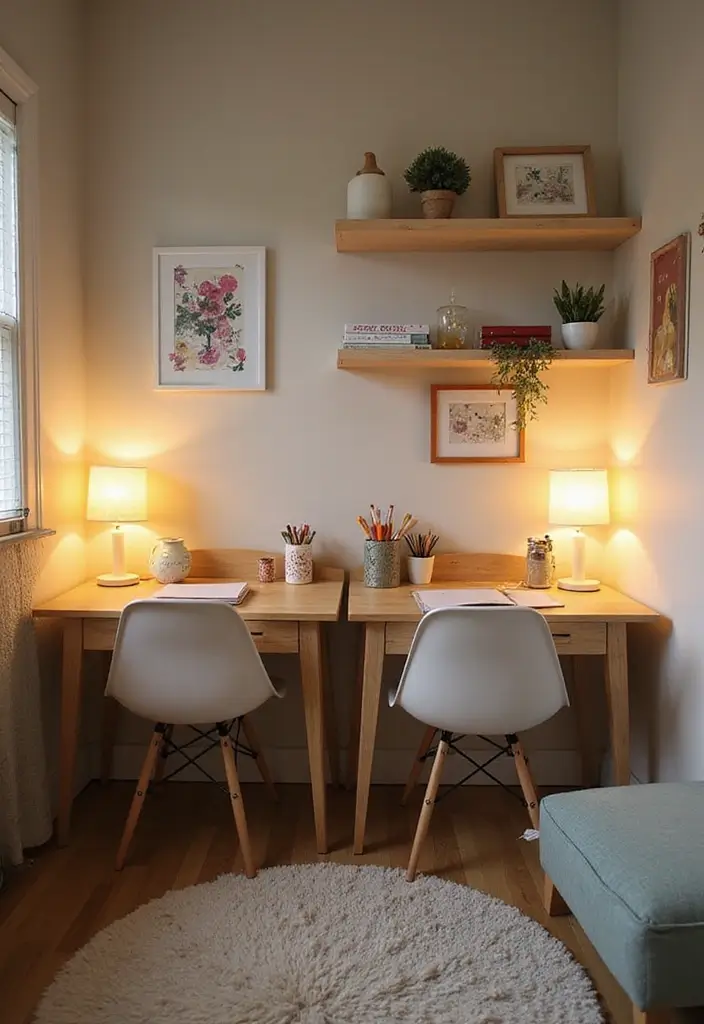
Two kids share one room and both need a solid study zone. A dedicated homework nook helps them stay focused and organized. Dual desks give each kid space to work without bumping elbows. Two compact desks work well. Place them side by side or push them against a wall to save floor space. Look for desks with built-in shelves or drawers so supplies stay within reach.
Here is how to set it up:
– Comfort first: Pick ergonomic chairs that keep backs straight and feet flat. Adjustable height helps both kids sit right.
– Brighten the workspace: Add a desk lamp or two. A bright, warm light makes late study easier on the eyes.
– Storage at hand: Choose desks with shelves or drawers. A small tray or bin helps pens, paper, and chargers stay tidy.
– Make it theirs: Let them add photos, magnets, or color accents. Personal touches boost pride and focus.
– Layout ideas: Side by side creates a shared zone with a common shelf. Or place desks against a wall and use a slim bookcase or pegboard between them for quick notes.
Next steps: measure the room, pick desks with built-in storage, plan lighting, and set up a simple cable solution. This setup builds independence and a little teamwork, so they can swap ideas and help each other with schoolwork.
5. Stackable Furniture
If you share a room, space is precious. Stackable furniture helps you keep floor space free for play.
Advantages of stackable furniture:
– Space-saving: When not in use, tuck chairs away to open up the room.
– Ready for guests: Add extra seating in seconds for friends or homework sessions.
– Mix of colors and styles: You can pick pieces that fit your kids’ tastes and the room theme.
With stackable pieces, you stay flexible. You can switch from study time to craft time without a mess.
Choosing the right stackable pieces
– Materials matter: Wood looks sturdy and clean; plastic is easy to clean; a mix can balance look and durability.
– Safety first: Look for rounded edges and non-slip feet.
– Weight and stability: Make sure the seats are easy for kids to lift and won’t tip easily.
– How they stack: Check that you can stack a few without wobbling.
– Color and style: Pick colors that match the bed, desk, or rug.
Practical setup tips
– Start with 2 sturdy chairs or stools by a desk or craft area.
– Store extra stools under a bed or in a closet when not used.
– Use a small tote to move them around during play or cleanup.
– Keep one chair free for guests or a reading corner.
Next steps: Measure your room, pick 2–3 stackable pieces, and test a quick layout this weekend.
Stackable furniture is a game changer for kids shared bedrooms! It not only maximizes space for play but also adds a splash of personality. Flexibility and fun go hand in hand—let the creativity flow!
6. Color-Coded Zones
In a shared kids’ room, space can feel crowded and mixed up fast. Color-coded zones give you a simple way to map out bedding, toys, and clothes. When your child spots their color, they know where things belong. Cleanup becomes quicker, and each kid feels they own their space.
Here is how to set up color zones:
– Bedding and curtains: Pick two or three colors. Assign one color to each bed and its window treatments.
– Storage: Use bins and baskets in those same colors. Add a label or a small color sticker on the front.
– Wall art and accents: Choose prints and decor in each child’s color. Let your kids help select pieces that fit their style.
Benefits come through in everyday life. Your children learn to grab their items at a glance. The room stays neat without feeling cold. It also adds a friendly, personal touch that shows each child’s personality.
Next steps: choose the colors together, buy matching storage, and swap in color blocks as your kids grow. With a few quick adjustments, the shared room stays organized and inviting.
If you need more ideas, start small and grow the colors over time.
7. Convertible Cribs to Twin Beds
Let’s break it down. You share a room and need beds that grow with your kids. Convertible cribs that turn into twin beds give you this and save you money over time.
They grow with your child, so you won’t swap furniture as they age. The move from crib to bed uses a simple setup that keeps kids safe with low rails and snug joints. You keep the same look in the room, which helps the space feel calm.
Benefits of convertible beds:
– Long-lasting: usable for many years as children age
– Easy to convert: quick steps so you can switch without a fuss
– Stylish designs: finishes and trims to fit shared bedroom decor
Here is how to pick one. Look for sturdy wood, a non-toxic finish, and a guard rail for the crib phase. Check conversion options to twin size and see how the bed height lines up with a dresser or play area. Measure the room so you can place it with a small reading corner and a night light.
Next steps: pick a color both kids like, set a budget, and plan a weekend setup. With the right convertible crib, you’ll have a bed that grows with your child and keeps a comfy, shared space.
8. Fun Wall Murals
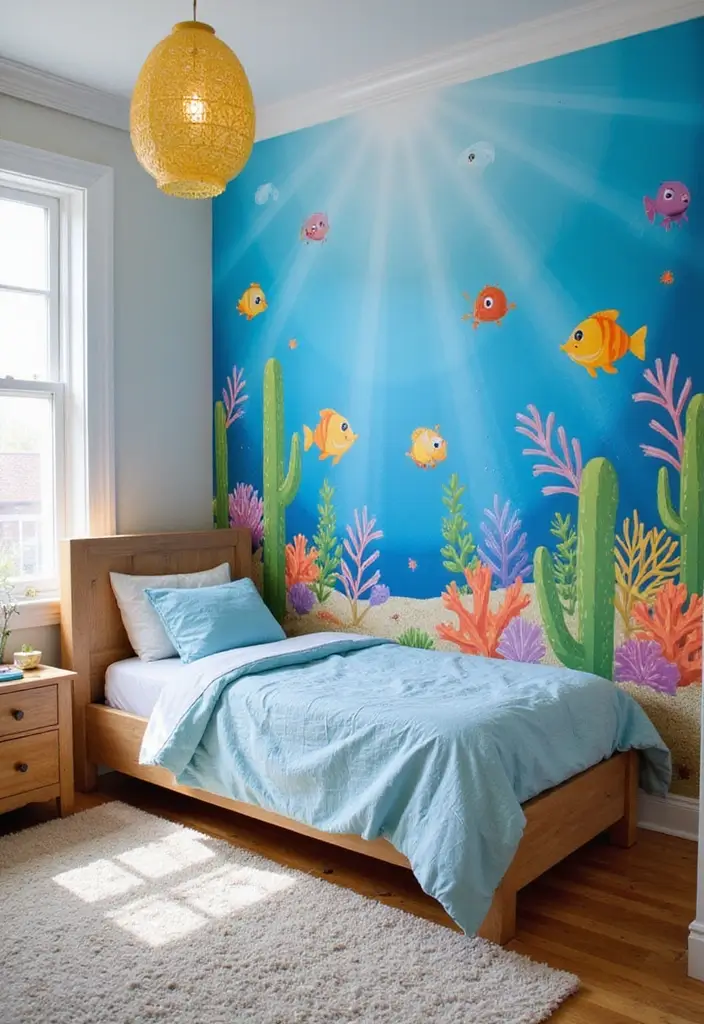
You want a shared bedroom that feels personal and easy to care for. Wall murals can help you get there fast. A dreamy sky, an ocean scene, or a favorite character turns a plain wall into a storytelling space. Murals give the room a clear focal point and a natural backdrop for beds and play zones.
Mural ideas to guide you
Here is why these choices matter:
– Easy application: Choose removable wall decals. They install quickly and lift off cleanly if you want a new look.
– Interactive designs: Pick murals with chalkboard finishes or colorable sections. Kids can draw, erase, and redraw as their ideas change.
– Collaborative projects: Make mural time a family project. Each child adds a part, like a cloud corner or a city block, to make something unique.
Materials to consider
– Removable decals for easy swap.
– Peel and stick wallpaper for larger scenes.
– Chalkboard paint on a panel for writing and doodles.
Next steps: plan before you peel. Measure wall space, pick a theme, and test a small patch first. Prep the wall, then apply decals or paint. Involve your kids and keep a simple, flexible plan in case tastes shift. Your kids will love the room they helped create.
9. Multi-Purpose Furniture
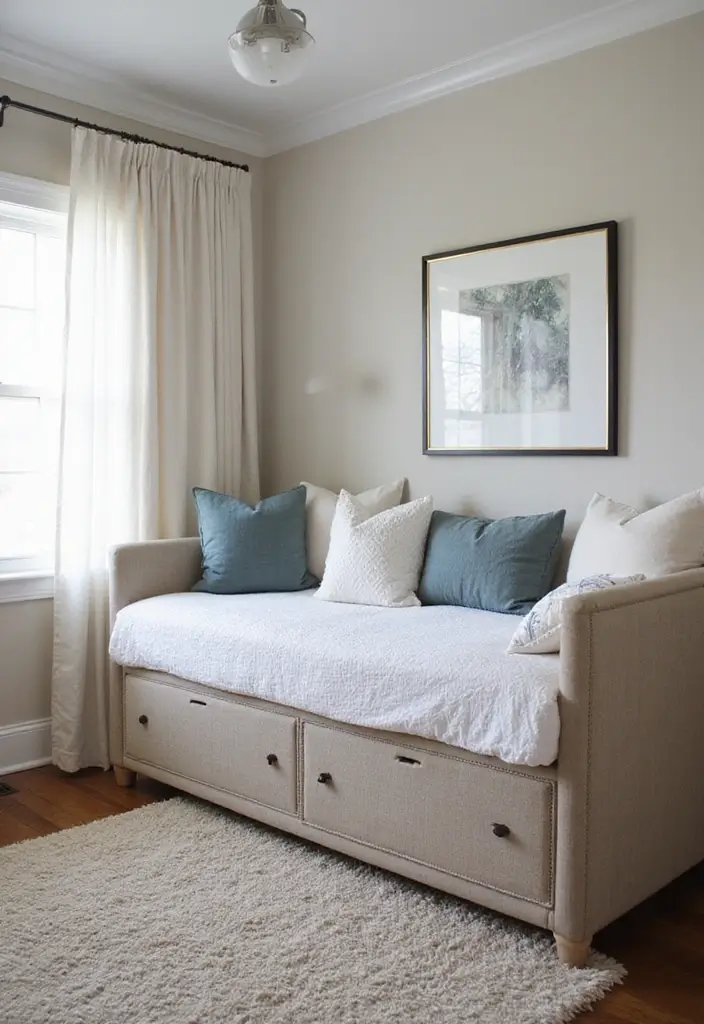
You want a shared kids’ room that feels big, friendly, and easy to keep neat. Multi-purpose furniture helps you reach that goal. It combines storage, seating, and sleeping space in one piece. You gain floor space now and a room that adapts as your kids grow.
What to look for
– Sturdy and safe construction with rounded edges
– Built-in storage to hide toys, games, and blankets
– Light enough to move when you clean or reconfigure
– Smooth, easy-to-clean finishes
– Color and style that both kids like
Smart examples
– Daybeds that double as lounging spots and beds
– Storage benches that hide toys and double as extra seating
– Foldable tables that stay out of the way when play begins
– Beds with drawers underneath for clothes, games, or shoes
– Ottoman seats that open for quick toy storage
How to use them
– Create zones: sleep, study, and play.
– Put beds against a wall to open the center for games.
– Tuck a bench at the end of a bed for toy bins.
– Install simple shelves at kid height for easy reach.
– Pick soft, washable fabrics for covers and cushions.
Next steps
Measure your space, choose one or two items, and test them for a week. Keep the layout flexible so you can swap as needs change.
This approach keeps the room calm and ready for adventures.
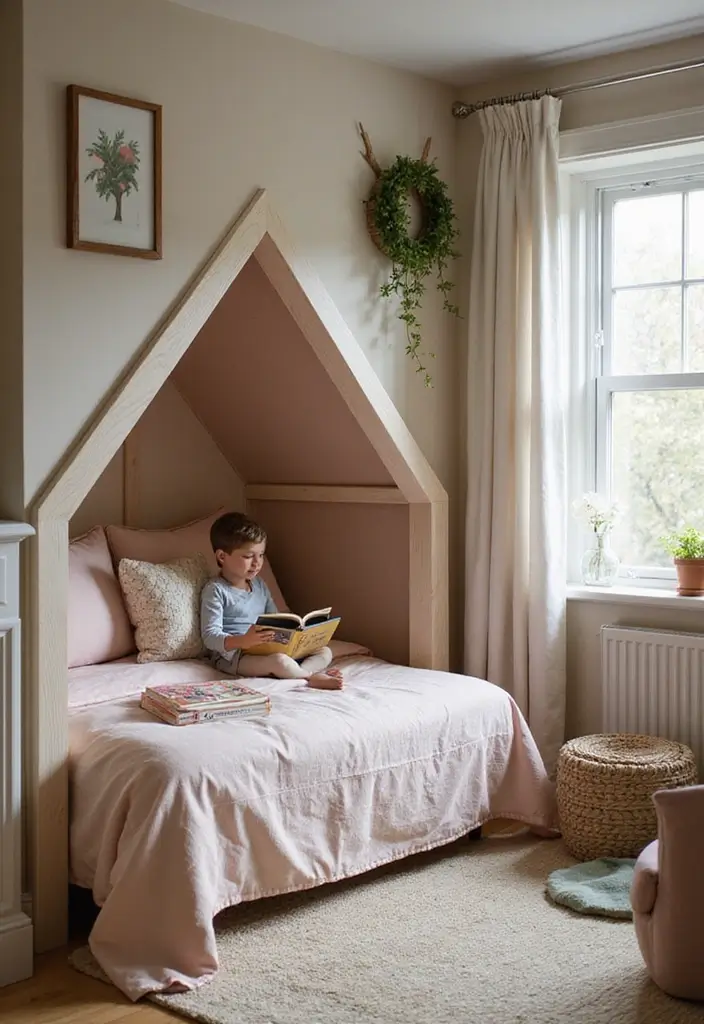
10. Cozy Reading Nook
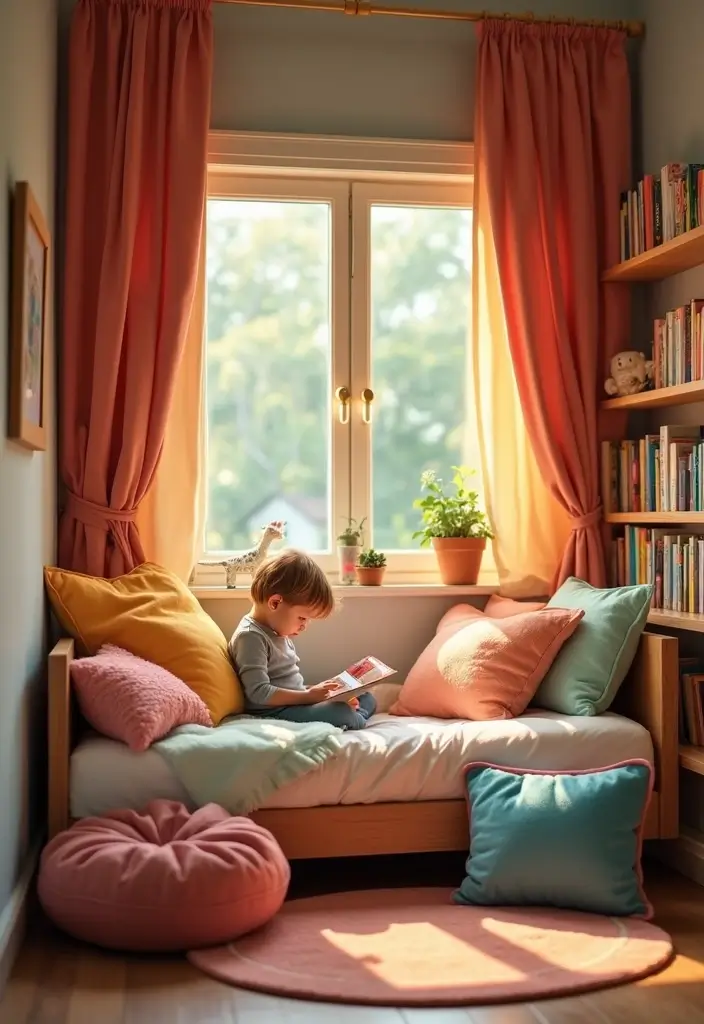
Here is why a cozy reading nook helps in a shared bedroom. You need a quiet spot where each child can read. A comfy corner gives them a place to unwind and enjoy stories. Look for a corner with wall space.
Next steps for layout. Choose seating that fits your room. A bean bag, a small chair, or floor cushions work. Add a short bookcase within reach. Use baskets for books and a simple label so each child can grab what they want. Leave space for legs.
Lighting matters. Pick a warm lamp or string lights to cast soft glow. Avoid glare from bright ceiling lights during reading. If you can, place the nook near daylight and use the lamp after dark. A dimmer helps when you want a calmer mood.
Let kids make it theirs. They can add their favorite books, photos, and simple decor. This keeps the space welcoming and easier to share. Set a simple rule: when one reads, the other respects the space and keeps it tidy.
Reading nook essentials:
– Comfortable seating: Choose a chair or cushions that invite sitting
– Personal touches: Let kids add books or decor
– Soft lighting: Use a lamp or fairy lights for a warm glow
11. Shared Closet Solutions
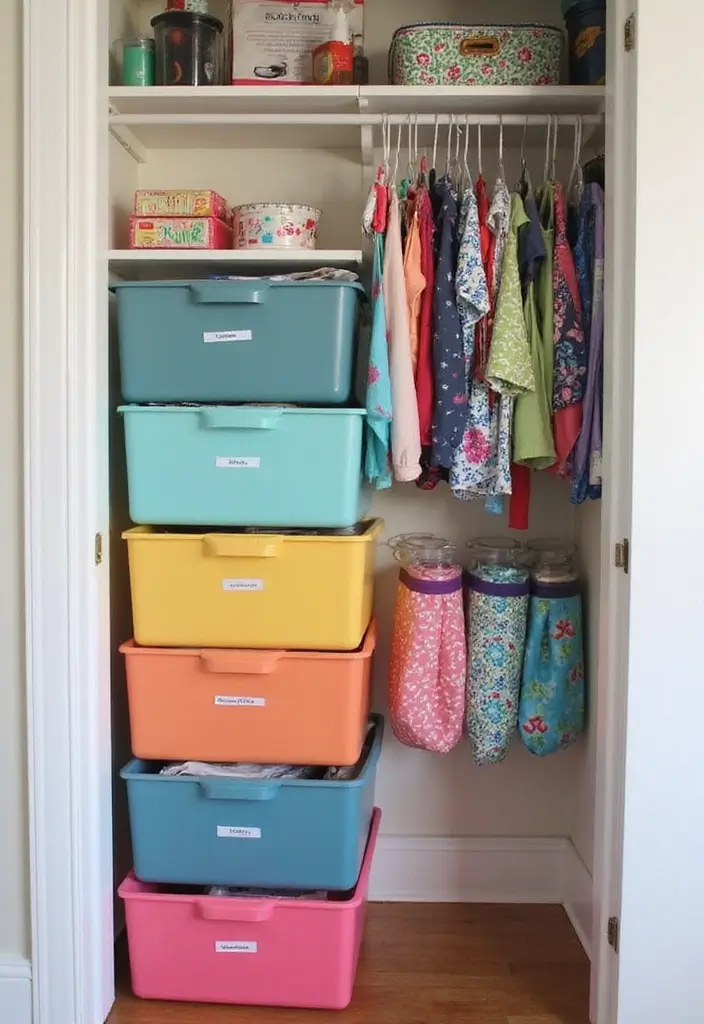
Sharing a closet with siblings can feel crowded. You gain space, cut fights, and teach your kids to take care of their belongings.
Shared closet tips:
– Vertical space: Use double hangers or tiered shelving to use tall sections. This frees floor space and keeps outfits visible.
– Color-coding: Pick a color for each child and use it on bins, hangers, and shelves. It makes items easy to spot and put away.
– Seasonal rotation: Help kids switch seasonal clothes twice a year. Store off-season pieces in clearly labeled bins near the top so you reach them easily.
– Clear containers: See-through bins show what’s inside. It speeds up choosing outfits and keeps clutter low.
– Labeled areas: Mark sections with names or colors for each child. Let them know which space belongs to them.
– Simple routines: Encourage a quick daily tidy with a 5-minute reset. A small habit beats a big mess.
– Kids participation: Have them put away clean items and return things to their spot. They learn responsibility.
An organized closet saves time, reduces stress, and builds useful life skills for later. Start small. You can grow the system as kids learn to tidy. Ask for quick feedback from them to adjust the setup.
12. Wall-Mounted Shelves
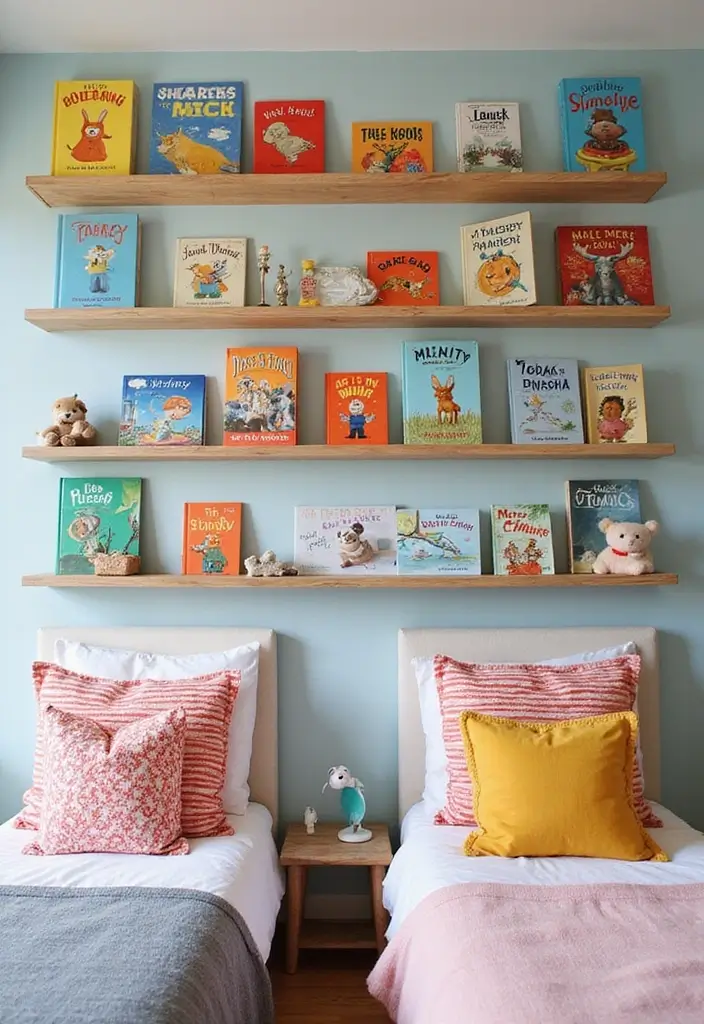
Here is why wall-mounted shelves fit a shared kid room. They free floor space and keep books, toys, and decor easy to grab. With shelves on the wall, the floor stays open for games and legos. Pick colors for a bright vibe or go with natural wood for a calmer look that grows with your kids. They adapt as your kids change.
Wall-mounted shelf ideas:
– Floating shelves: Sleek and simple. They sit on the wall with no big brackets in sight. Try a staggered pattern to add playfulness and draw the eye up. Use them for picture books, small plush toys, or jars of art supplies.
– Themed displays: Let shelves tell a small story. Show a favorite book set, a tiny trophy, or a collection of tiny toys. Rotate items every few weeks so the display feels new.
– Height considerations: Put shelves where both kids can reach. A lower row works for daily items. A higher row can hold seasonal decor or keepsakes. Leave some space under each shelf to avoid bumps.
Next steps. This setup saves space and invites kids to help decorate. To install them, measure the wall, pick sturdy shelves, and use anchors if you mount on drywall. Keep the weight light and avoid sharp edges.
13. Luggage Storage for Toys
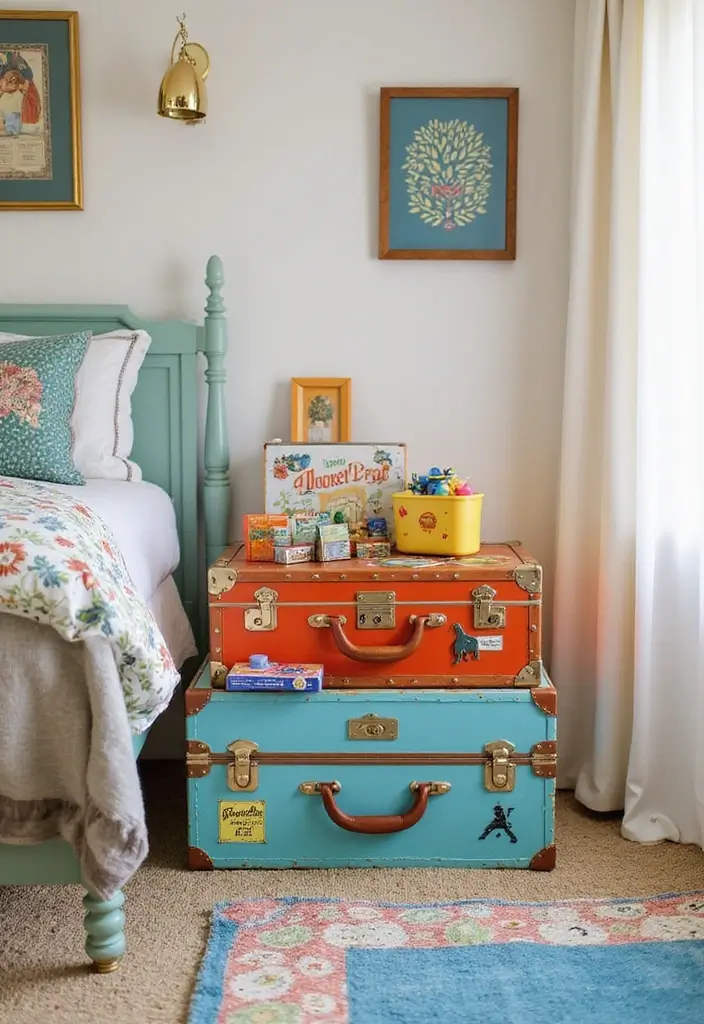
Here is why you want a simple toy storage idea that looks good. Storing toys can feel loud and messy. Luggage storage can fix that with style and order.
Turn old suitcases or decorative baggage into toy chests. They tuck under beds or sit on a shelf as part of the room’s decor. Kids love a chest that looks like a mini bag from a trip.
Why luggage works:
– Unique style. Choose prints you love or mix in vintage pieces.
– Easy access. A simple latch helps kids tidy up.
– Versatile uses. They hold toys, dolls, costumes, or games.
Using luggage for storage blends function with play. It helps tidy up and adds a playful touch to the space.
Tips for this idea:
– Choose a light piece with a sturdy lid.
– Line the inside with fabric to protect toys and clean easily.
– Label the outside with a kid-friendly tag or picture.
– Place under the bed or on a low shelf at child height.
– Stack several suitcases to form a storage tower.
With some planning, this luggage idea keeps the room neat and feels like a travel corner. It makes the space calm and cozy.
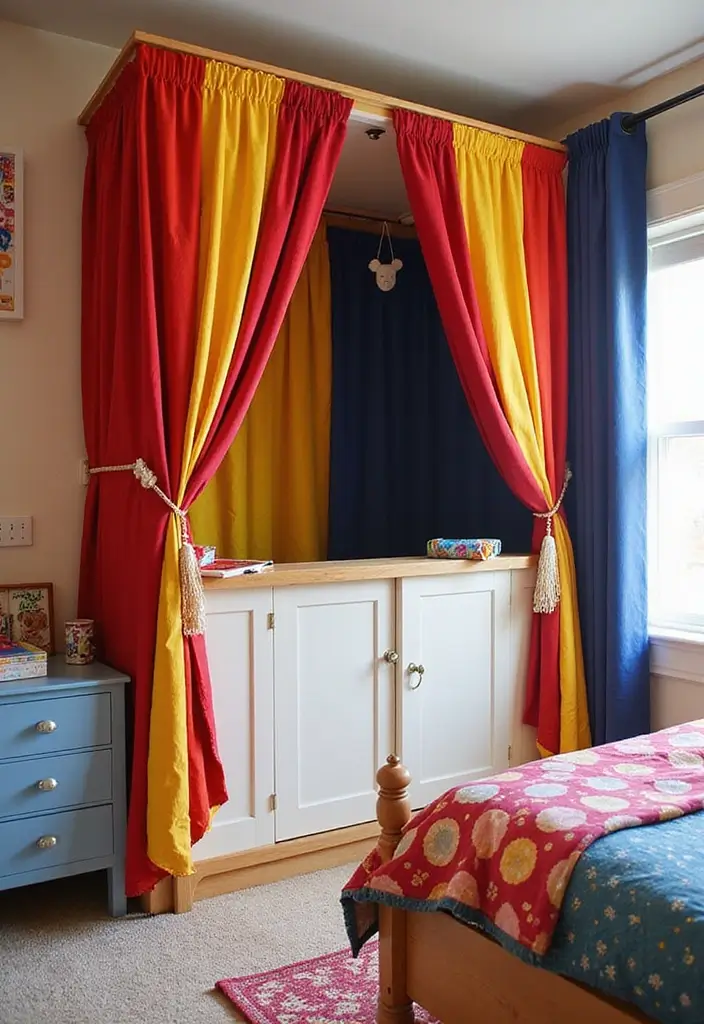
14. Playful Canopy Beds
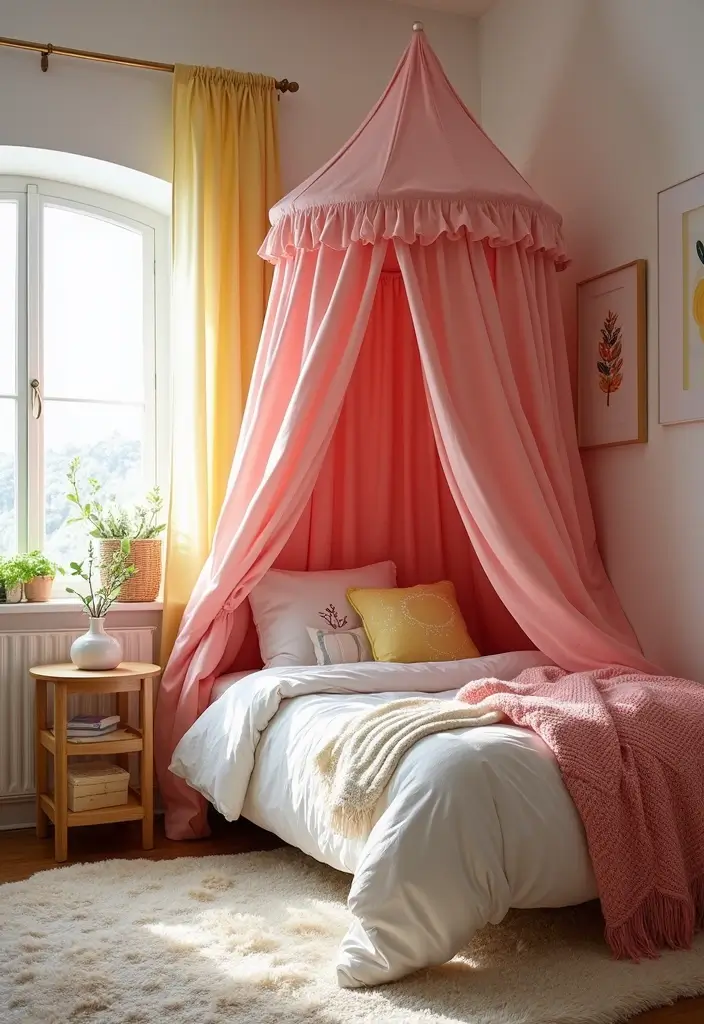
You want a bed that sparks imagination and keeps a shared room calm. A canopy bed helps. It creates a cozy private spot and adds adventure. Choose themes from princess to pirate and keep the space light.
Why canopy beds work in a shared room:
– It gives your child a safe zone to use.
– It adds a decorative touch that fits many styles.
– It is easy to refresh by swapping fabrics.
– It invites imaginative play and calmer bedtimes.
Styles and fabrics:
– Choose fabrics such as cotton voile, lightweight linen, or sheer muslin.
– Choose colors that match the room and your child’s mood.
– Swap fabrics with the season to refresh the look.
How to set one up:
– Mount a light frame or hang a simple rod from the ceiling above the bed.
– Use breathable fabric and tie back for an open feel during the day.
– Add string lights for a gentle glow.
– Keep the height low to avoid clutter and be safe.
Care and safety:
– Check for loose cords and keep fabric away from heat sources.
– Wash fabrics gently and air dry to keep colors bright.
Limitations and quick tips:
– It needs floor space and can collect dust.
– It costs more than a plain bed, but you can start small.
Next steps:
– Start with a simple, removable canopy you can wash.
15. Personalized Name Tags
If you want your kids to feel they own their space and keep their stuff in a shared room, personalized name tags can help. They make it easy to spot what belongs to whom and cut down on little fights over lost items. Plus, they add a splash of color and personality to the room.
Here is why this works.
How to create name tags
– DIY project: Gather safe materials like thick cardboard, colorful markers, and clear packing tape. Let each child write their name in a fun font, add stickers, and laminate the tag when you’re done. You can punch a hole and tie it to a bed rail or bin handle.
– Style and colors: Pick colors that match each kid’s favorite shades. Use friendly fonts and simple icons, like a tiny star for the busy kid or a heart for the calm one.
– Placement ideas: Put tags on beds, storage bins, bookshelves, drawers, and even lamps. Make sure they’re easy to read from a standing view.
– Make it a game: Turn labeling into a quick scavenger hunt. Hide a few extra tags and have kids find their own items as they label.
This small touch teaches respect for others’ space and brings more personality to the room.
Personalized name tags turn chaos into harmony! Give each child a sense of ownership in their shared bedroom while adding a splash of color and personality to the space.
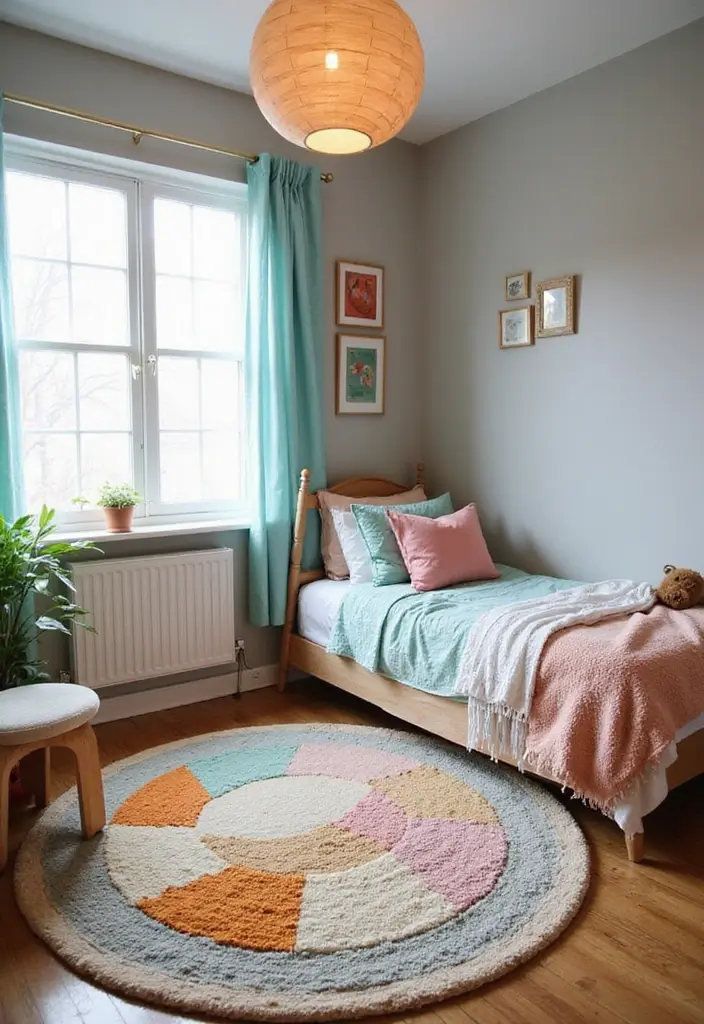
16. Soft Area Rugs
Two kids share a room and you want warmth plus clear play zones.
Here is why soft area rugs fit a shared space.
Soft area rugs can do that.
They make the floor feel comfy for sitting and playing.
They also add color that ties the room together.
Rug picks that work for kids:
– Non-slip base or a rug pad keeps rugs from sliding.
– Washable fabrics make spills easy to clean.
– Low pile gives a soft feel and stays easy to move on.
– Durable materials like nylon, cotton, or microfiber hold up to busy hands.
– Bold colors or big patterns help mark a play area.
How to lay them out:
– Start with a large rug under the bed to anchor the space.
– Add a smaller rug near a reading nook or craft corner.
– Layer a plush rug over a flat weave for depth and warmth.
Care and upkeep:
– Vacuum regularly to keep dust down.
– Spot clean spills with mild soap and water.
– Machine wash when the label says it is safe.
– Rotate rugs every few months to wear evenly.
Soft area rugs invite kids to lounge, read, and play. They bring color, define spaces, and keep feet warm.
17. Playful Lighting Fixtures
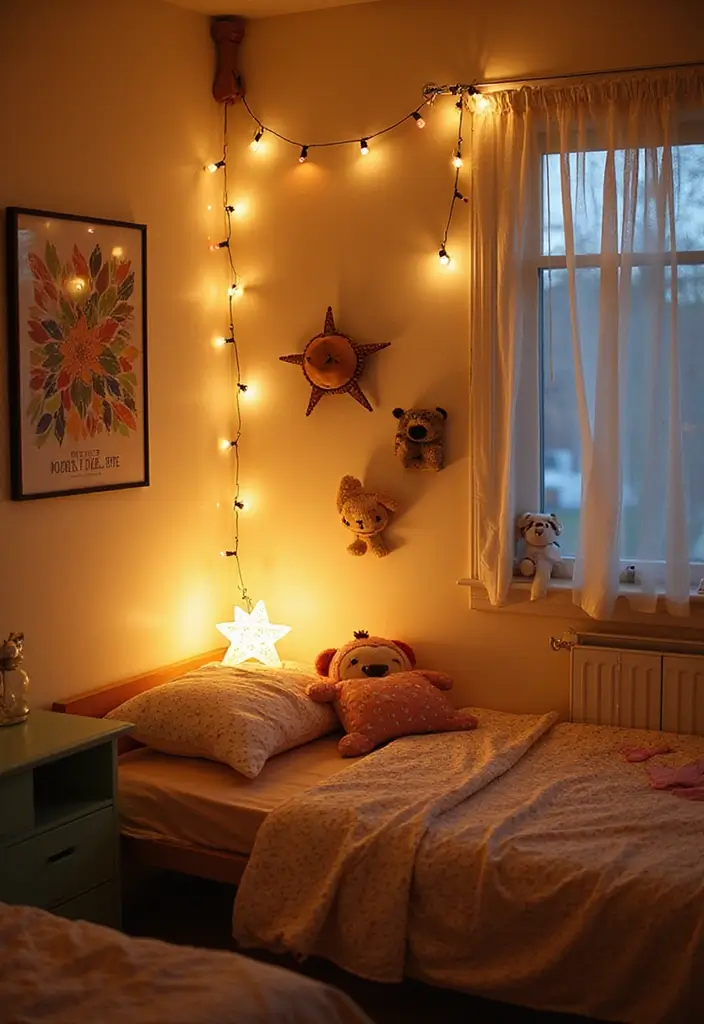
If you share a room, you need lighting that helps you sleep, read, and feel good in your space. Good lights make shortcuts to calm and easy mornings. Start with a few playful fixtures that fit your room theme.
Think of fixtures shaped like stars or clouds. They bring a friendly glow and look cool in photos too. A central ceiling light gives steady mood lighting without harsh glare. Then add string lights for a soft, magical feel at night.
Lighting ideas
– Colorful shades: Pick lamp shades in soft colors that brighten the space without blinding you.
– Dimming options: Use lamps with dimmers or smart bulbs so you can ease into bedtime light.
– Interactive elements: Look for lights that change color or shape with a switch or remote for a fun, hands-on touch.
Next steps: keep safety in mind. Use LED lights for cool surfaces and low heat. Run cords neatly and keep plugs out of reach. Choose two light layers—ambient for the room and task lights near beds for reading.
With these tips, your shared bedroom stays functional and full of charm. You get easy night lighting, cozy mood, and rooms that feel like both kids can enjoy.
18. Folding Play Tables
You want a craft zone that fits a small room. Folding play tables give you a clean, ready space for art and games, and they disappear when you store them.
Benefits of folding play tables
– Easy storage: fold flat and slide it under the bed or behind a door.
– Quick setup: unfold, sit a chair next to it, and you are ready in seconds.
– Durable and kid friendly: sturdy legs handle paints, beads, and snacks without wobble.
With a folding table, your play area stays flexible and tidy.
What to look for when buying
– Size and height: a top about 24–30 inches wide and a height of 22–28 inches keeps kids comfy.
– Materials: plastic or resin keeps it light; wood adds lasting strength. Look for rounded edges.
– Construction: solid legs and a simple latch keep the table steady.
– Style and color: choose a shade that fits the room so the table blends in.
Placement and storage tips
– Pick a bright spot near natural light.
– When folded, tuck it in a closet, behind a door, or under a bed.
Practical uses
– Set up for crafts, puzzles, or a quick snack time. Let kids spread out paper, crayons, and glue without mess.
– Pair with a small chair and a few bins for brushes or markers.
Care and safety
– Wipe spills quickly with a damp cloth.
– Use non-toxic supplies.
– Check screws and legs regularly.
Limitations
– Folding tables may be lighter and feel a bit wobbly on uneven floors.
Next steps
– Choose a size you can move easily and a color that lifts the room.
– Look for extra features like built-in storage or a cup holder.
Start with a simple 24×30 inch table you can move easily.
19. Slide-Out Beds
Struggling to fit two beds into a small shared room? Slide-out beds can give you space for play while still giving each kid a comfy sleep spot. They stay tucked away in the day and roll out at night with a smooth, quiet glide. Pick a design that matches your decor, and the room will feel bigger.
Advantages of slide-out beds:
Here is why they work.
– More floor space for toys, desks, or a play zone.
– A variety of styles fits any theme, from warm wood to bright colors.
– Bedtime becomes a quick, easy routine kids can enjoy.
How to choose and use them:
Let’s break it down with practical tips you can act on.
– Measure the room and note the slide-out clearance. Make sure there is a clear path.
– Check the rails, locking mechanism, and edge safety. Look for a smooth glide and sturdy support.
– Pick a finish and style that match your furniture and colors.
– Choose a design with a gentle edge and safe corners for younger kids.
Setup tips and routine:
Next steps.
– Place the bed along a wall where the slide won’t hit desks or lamps.
– Keep a low shelf or cubbies nearby for blankets, books, and nightlights.
– Teach your child a simple routine: slide out, tuck in, slide back. It stays calm and tidy.
If you keep it simple and safe, slide-out beds can be a real win in a shared room.
20. Magnetic Board Displays
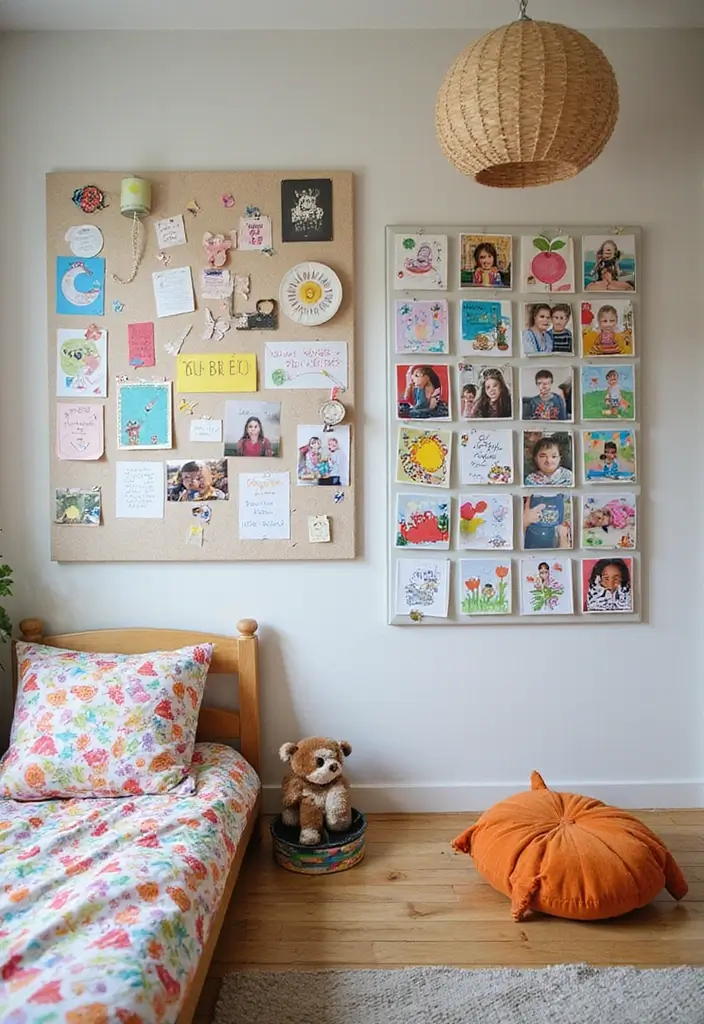
If you want a simple, tidy way to show your kid’s art and notes, try a magnetic board. It holds drawings, photos, and awards. It can go on a wall or on the inside of a closet door. It makes the room feel alive and organized.
What it is is clear. A magnetic board is a metal surface or a wall coated with magnetic paint. Magnets grip the surface. Your child can swap art in seconds.
Why magnetic boards work:
– Interactive: Your child changes the display whenever they want.
– Functional: Use magnets to keep reminders or notes from you.
– Educational: Hang letters, numbers, or mini teaching cards for quick learning.
Let’s break it down with practical setup ideas.
– Size matters: Start small with 18×24 for a door, or go bigger like 30×40 on a wall.
– Pick the surface: A steel board, a magnetic metal panel, or magnetic paint on the wall.
– Magnets first: Choose bright, strong magnets. Use a mix of clips and flat magnets.
– Section it: Create a kid zone for each child or a shared mix in the middle.
– Art rules: Use clip magnets for easy swaps. Add name magnets to keep things in place.
Next steps you can try today:
1) Choose the spot and measure the space.
2) Prep the surface or prime if you use magnetic paint.
3) Mark zones and place the magnets.
4) Start with a few pieces and rotate weekly.
Two quick tips: label magnets by child and keep a small art bin nearby. Schedule a monthly art chat to keep the board fresh. This simple board brings creativity to the room and makes daily routines easier.
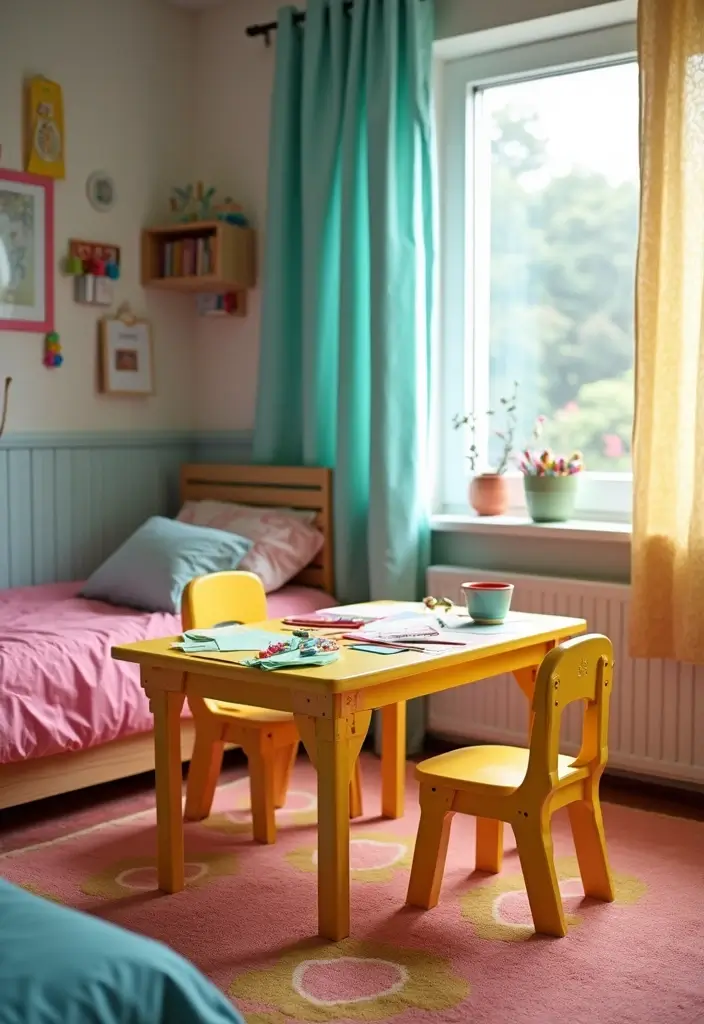
21. Arts and Crafts Station
You want a shared bedroom that sparks creativity, not chaos. A dedicated arts and crafts station can make projects easier and more fun for both kids. Start with a small table that has storage so supplies stay in reach and out of the way. A compact desk at a comfortable height helps little hands cut, glue, and draw without strain.
Craft station essentials:
– Storage containers: use clear bins, jars, or cannies. They keep crayons, markers, paper, and stickers easy to see and grab.
– Bulletin board: hang a cork or felt board. It becomes a rolling gallery for new art and school projects.
– Stock and restock: keep a simple list of what’s low. Refill shelves weekly so ideas don’t stall.
– Wall helpers: add a pegboard or wall shelf. Place scissors, glue sticks, and washi tape within easy reach.
– Lighting and comfort: a bright desk lamp and a small chair make the space inviting and comfortable.
All together, this craft corner turns the room into a place for imagination. Kids can work side by side or take turns, clean up quickly, and feel proud of what they create. Use color coding and labels to keep items tidy. With a good system, your arts and crafts station becomes a real hub for creativity in a shared bedroom.
Next steps: pick a corner, measure the space, and start with the table.
22. DIY Puppet Theater
Here is a simple way to add a play space in a shared bedroom. A DIY puppet theater tucked in a corner gives kids a place to perform, tell stories, and have fun together.
What you need
– A lightweight fabric and a simple curtain rod.
– A sturdy corner to hang the setup.
– A small prop shelf or box behind the curtain.
– A nearby basket for puppets and masks.
– Soft lighting to focus the stage.
How to set it up
1) Mount the curtain rod high enough for easy opening and closing.
2) Drape the fabric to cover the opening and create a clean stage.
3) Place a small shelf or box behind the curtain for props.
4) Put puppets in the nearby basket so they are ready to go.
5) Add a string light or clip-on lamp for a cozy glow.
Ways to use it
– Let kids make quick shows with sock or finger puppets.
– Encourage them to write a simple script or improvise.
– Have a family show night to celebrate effort and sharing.
Benefits
– Builds confidence, language, and teamwork.
– Sparks imagination with colorful costumes and stories.
– Keeps play contained and respectful in a shared room.
Next steps
– Rotate puppets weekly.
– Swap fabric colors to change the mood.
– Keep the area tidy with a quick wipe or box swap.
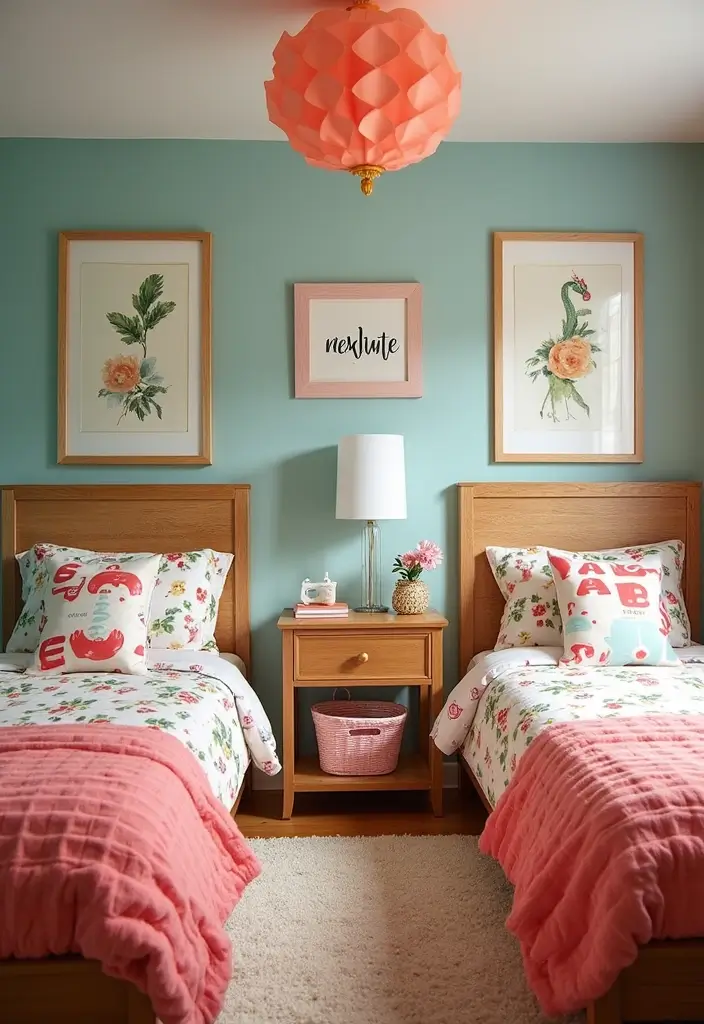
23. Cartoon-Themed Bedding
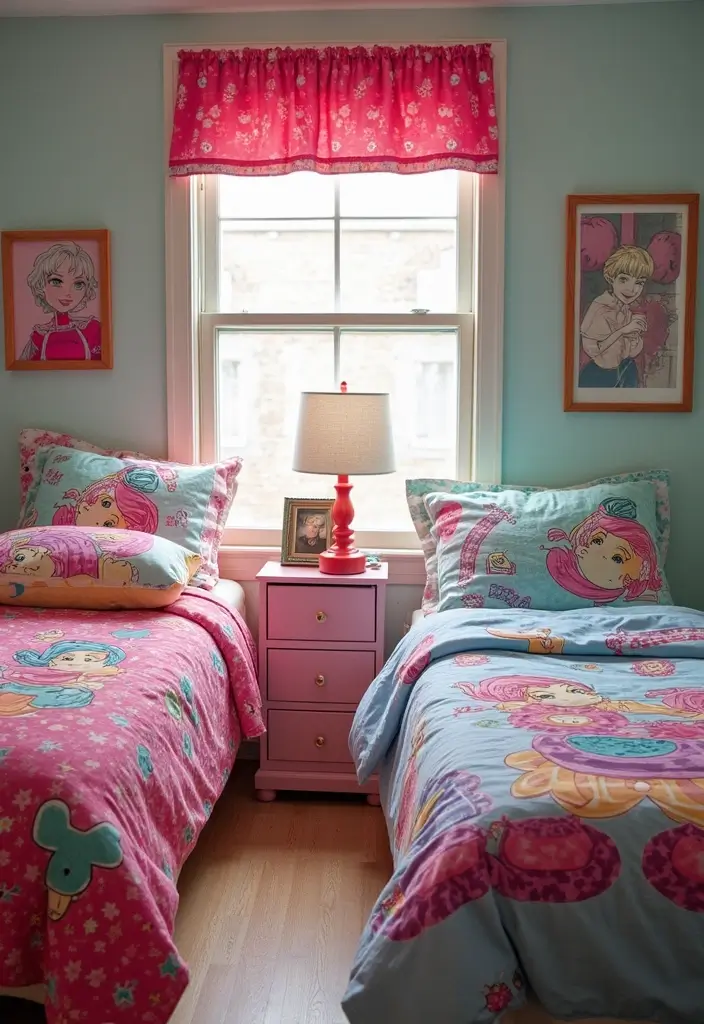
In a shared room, the right bedding helps both kids feel at home. Cartoon-themed sets give each child a corner that looks like theirs. You can choose bold heroes or softer character scenes. Bright prints wake the eye; calm colors soothe at bedtime.
Here is why this works: kids see their favorites in the sheets, so they take pride in their space and keep things tidy.
Materials matter. Look for 100% cotton or a cotton-poly blend. They wash well, last long, and stay comfy after every night.
Coordinate with your decor. Match bedding to wall color, curtains, and rugs for a united look. Mix and match by letting each bed show a different character, but stay in the same color family so the room still reads as one space. Add a shared element, like a stripe of the same color on each bed.
Bedding tips:
– Coordinate with decor: Match bedding with wall colors for a cohesive look.
– Mix and match: Let each bed show a different character to fit both kids.
– Quality matters: Choose durable fabrics that stand up to washing and playing.
– Easy care: Pick machine-washable sets that keep colors bright.
Cartoon-themed bedding makes bedtime personal and easy for two kids.
Bedding isn’t just for sleep; it’s a canvas for kids’ imaginations! Cartoon-themed sets let them express their favorites while making their shared bedroom feel like home sweet home.
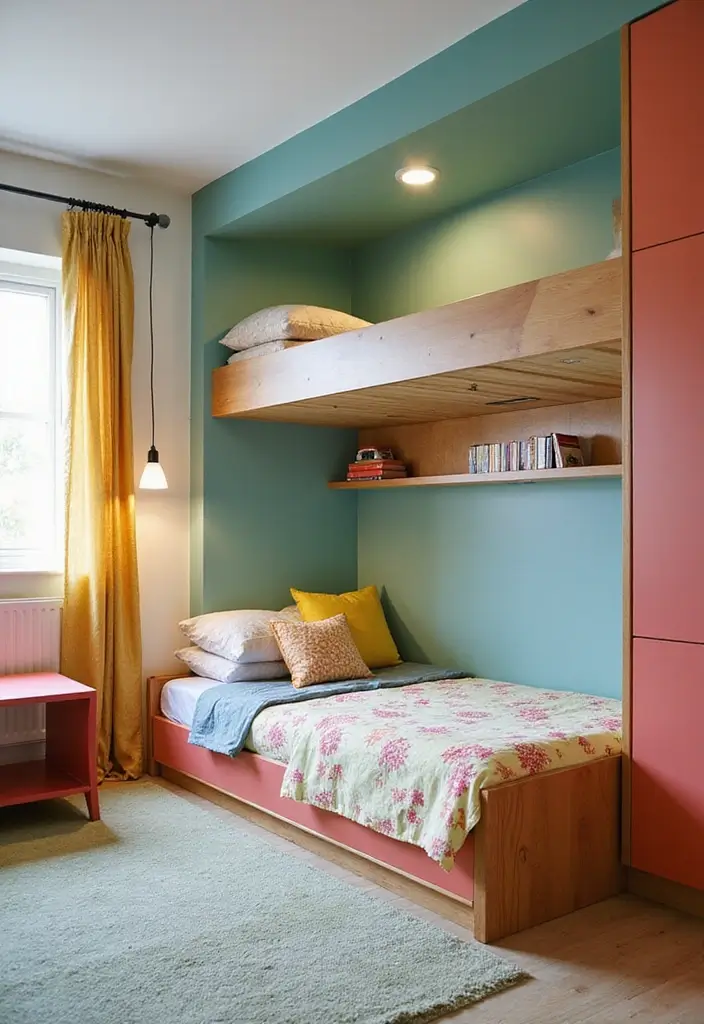
24. Hideaway Reading Beds
You want a bed that hides away but also becomes a cozy reading nook. Hideaway reading beds do that. They tuck away during the day and pull out for story time at night. This makes reading feel special and easy to reach.
Benefits of hideaway reading beds:
– Space saver: Great for small rooms, every inch matters.
– Comfort: Plush pillows, soft sheets, a warm glow lamp.
– Literacy boost: Kids use a private spot to read, build focus, fall in love with books.
– Easy bedtime routine: After stories, bed is ready without clutter.
Next, practical setup tips:
– Pick a wall that has enough room to pull out. A mattress that folds or slides helps.
– Use a light, soft color and simple bedding so it looks calm at night.
– Add a small shelf or basket nearby with a few favorite books.
How to make it real:
– Choose a platform bed that folds into a thin unit or a clever accordion bed.
– Include a reader-friendly lamp with adjustable brightness.
– Install safe edges and guardrails if your child is little.
Maintenance and care:
– Regularly check the pull-out mechanism and keep it clean.
– Wash sheets in a breeze on weekends.
– Keep a little storage bin for blankets and cushions.
25. Chalkboard Walls
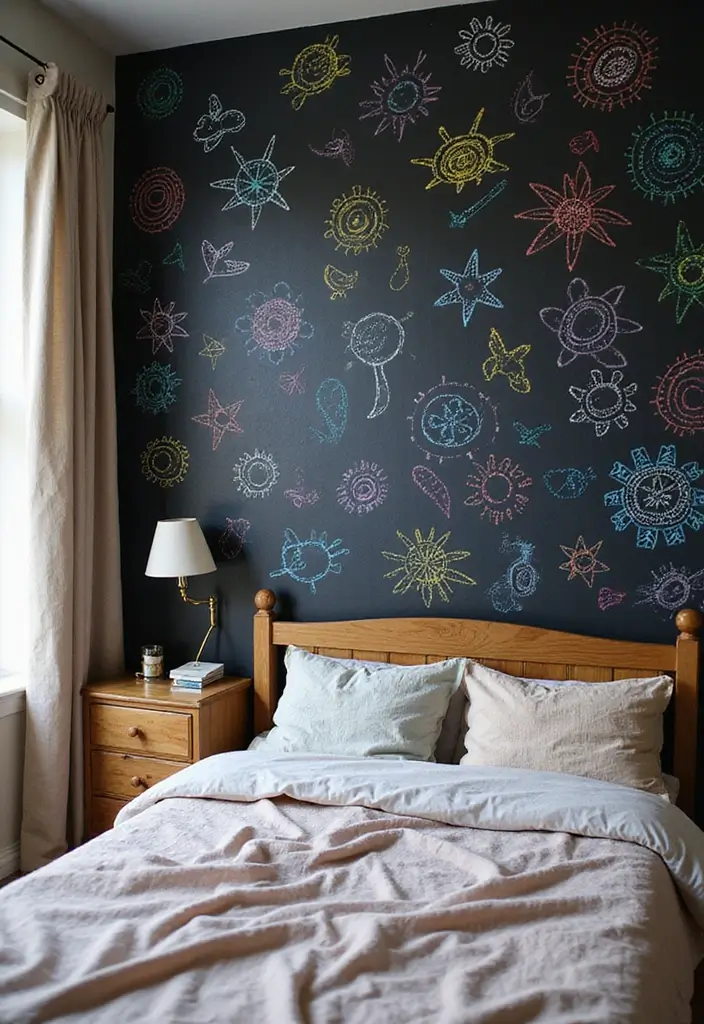
If you share a room and want a space that stays playful and organized, chalkboard walls can help. A chalkboard panel becomes a big, reusable surface for art, notes, and plans. Your kids can doodle, jot reminders, and plan projects without a pile of papers. This is safe for kids and easy to clean.
Chalkboard wall benefits:
– Endless doodles: Kids can draw a fresh picture every day with almost no mess.
– Learning on the wall: Use quick spelling games, math drills, or a chores list.
– Easy refresh: Wipe the board clean and start again in seconds.
Here’s how to set it up in a few simple steps.
– Choose a spot: Pick a wall or panel at eye level, about 4 to 5 feet high.
– Prep the surface: Clean the wall, rough up glossy areas, and tape edges.
– Paint it: Use non-toxic, water-based chalkboard paint. Apply two coats; dry.
– Season the board: Rub chalk on the surface, then wipe clean.
– Maintain: Wipe daily with a damp cloth and dust corners.
– Make it kid-friendly: Split the space into zones and add magnets or cork.
If you want more looks, try magnetic chalkboard paint or softer tones like gray or green. Keep it fresh with regular cleaning so chalk stays easy to wipe away.
26. Personalized Growth Charts
Want a simple way to celebrate your kids as they grow in a shared bedroom? A personalized growth chart fits that job.
Choose a style that fits the room. Think a painted wood ruler, vinyl decal, or a fabric chart in a frame. Let each child mark their height along the line. It turns growth into a story you can see every day.
Growth chart tips:
– Placement: Hang it where both kids can reach with a small step stool.
– Custom designs: Let them pick colors, add their name, and choose kid-friendly icons.
– Timeless memories: Save the chart in a keepsake folder or photo album and note dates for each milestone.
This decor piece adds memory to the room. It becomes a living record of their journey.
Practical tips to keep it neat: choose durable materials. Wood lasts for years, vinyl wipes clean, and fabric charts can stay tidy in a framed display. Mark with pencil first, then light ink to update.
Next steps: decide the size, pick a style, and hang it in a shared space. Make yearly marks on birthdays to build a memory you look back on together.
With care, the chart grows with your kids and keeps the room warm and personal. If one child moves to a different room, you can roll or fold the chart for safekeeping.
27. Wall Art Displays
You want a wall in a shared bedroom that feels personal but stays neat. Wall art displays give you that balance. They let each kid shine and they’re easy to update as tastes change.
Art display tips:
– High and low: place some art higher on the wall and some lower to create a lively lineup.
– Mix styles: use a mix of frames, boards, and clips for a dynamic look.
– Frequent updates: invite kids to swap in new pieces regularly so the display keeps growing.
Clipboards on a ledge or rail: easy to swap and recycle old art.
Framed gallery wall: combine different sizes and frame colors for a kid-friendly collage.
Wire or string with clips: a flexible, kid-friendly option that can stretch across a wall.
Corkboard or pegboard: a ready-made zone to pin drawings, photos, and awards.
Floating shelves: hold a few frames plus small trophies or 3D crafts.
How to set it up in your room
– Think height variety to keep it interesting.
– Group by kid or by theme for quick swaps.
– Leave space for new art and future projects.
Next steps
– Measure the wall, pick two to three methods, and gather clips, frames, and tape.
– Sketch a simple layout on paper before you drill.
– Mount securely with proper anchors to keep pieces safe.
Wall art displays give energy to the room and build pride in your young artists.
28. Interactive Wall Stickers
Your kids share a room and you want decor that stays fresh. Interactive wall stickers fit that need. They’re easy to move, so the layout can grow with them. They change the look without repainting.
Benefits of interactive wall stickers:
– Engaging: Kids swap stickers to form new scenes.
– Educational: Pair each sticker with a quick fact or question.
– Removable: They peel away cleanly with little residue.
– Safe and simple: Made for walls and small hands.
Here is why this works in a shared space. You get art that doubles as a learning tool. Switch themes with a weekend project, turning walls into a map, a solar system, or a weather chart.
What to pick and how to set it up. Go for easy-peel vinyl decals in kid-friendly colors. Try these themes:
– Maps and geography
– Space and planets
– Math, letters, or science icons
Let’s break it down with a quick plan:
– Choose a wall near a desk or bed.
– Group stickers into zones (Geography, Space, Math).
– Start with a simple outline and add details over time.
Care and use tips. Wipe with a damp cloth. If you want a new look, reposition stickers. Make sure the wall is clean and smooth before you apply them.
Plan your first layout: measure the wall, pick a kit, and test a sticker on a small spot first. Then decorate and learn at the same time.
29. Temporary Wallpaper
Section
Temporary wallpaper helps a shared kid’s room get a fresh look without a big commitment. It sticks to walls and peels off cleanly when you want a new theme. There are many designs to choose from, so you can match the room to your child’s interests. Kids can pick a pattern and help apply it, making the project a fun shared activity.
Why choose temporary wallpaper
– Removable: you can take it down easily when it’s time for a change.
– Wide variety: patterns, colors, and scenes fit any mood.
– Hands-on project: children learn color, placement, and teamwork.
How to pick and prep
Look for kid-friendly images and durable material. Check that removal leaves no sticky mess. A simple, calm design often works best in a busy room.
Step-by-step install with kids
– Measure the wall and cut strips a bit longer.
– Clean the surface so it sticks well.
– Start at the top, peel a small patch, and press down.
– Smooth with a card to remove air gaps.
– Align the next strip.
– Let kids help with pressing and lining up edges.
Tips and limits
– Use one wall as an accent to keep it easy.
– It won’t last as long as paint, but it’s easy to reset.
– When you’re ready to remove, warm water helps lift the paper.
Next steps: gather supplies, plan the scene, and enjoy a kid-friendly decorating session.
30. Interactive Game Corner
Here is why a game corner helps your kids share a room. You set the tone by choosing a small, easy stretch of floor for play. It gives them a clear spot to play, cuts down on mess, and teaches them to take turns.
Game corner essentials:
– Storage: Use baskets or bins to keep games, puzzles, and cards in one easy spot.
– Seating: Add comfy seating that moves easily, like bean bags or floor cushions.
– Decor: Add framed game posters or wall art to set the mood.
– Tech option: If you add a console, keep cords tidy with a small shelf or box.
– Play area: Leave a clear space nearby for boards, chats, or quick breaks.
– Rotation: Swap games every week to match ages and moods.
This setup helps kids stay engaged and learn teamwork while they play.
Next steps: measure the corner from wall to wall.
Pick sturdy storage and label the bins so toys go back in the same place.
Choose 3 to 5 games to start with, and add 2 or 3 cozy seats.
Rotate items every season to keep things fresh and fun.
If you want more, plan a simple rule: take turns by age or draw for first pick.
Clip cords, store smaller pieces in zip bags, and label boxes.
Conclusion
Designing a shared bedroom that’s both functional and fun can indeed be a rewarding experience.
From clever storage solutions to playful themes, these ideas can enhance the shared space, making it a delightful retreat for your children. Encourage their individuality while promoting shared interests, ensuring they feel right at home.
Explore these creative solutions and turn the challenges of a shared room into an adventure of joy and organization!
Frequently Asked Questions
What are some practical space-saving furniture solutions for kids shared bedrooms?
When designing kids shared bedrooms, consider using bunk beds with storage or loft beds that allow for a desk underneath. This setup maximizes sleeping space while keeping the room organized. Additionally, multi-purpose furniture can combine storage and seating, making the most of limited space.
How can I incorporate themes into a shared bedroom for kids?
Choosing a playful bedroom theme can make the space feel special for both children. Collaborate with your kids to select a theme they both enjoy, such as a jungle or space motif. This can guide your decor choices, including bedding, wall colors, and accessories, making it easier to create a cohesive look.
What are some effective organization tips for a shared kids room?
To maintain order in a shared kids room, consider implementing color-coded zones for each child’s belongings. This helps them identify their items easily. Additionally, using under-bed storage solutions and wall-mounted shelves can keep toys and books organized and out of the way, leading to a calmer environment.
Are there creative decor ideas to personalize a shared bedroom?
Absolutely! Personalized name tags for storage items or beds can help each child feel ownership of their space. You might also consider interactive wall stickers or chalkboard walls that allow for creativity and change. These options make the room feel more personal and engaging for both kids.
How can I create a homework-friendly environment in a shared kids room?
To create a conducive study space, consider adding dual desks to provide each child with their own area for homework. Ensure the desks are compact to save space and can be placed in a quiet corner. This setup encourages focus and organization, making homework time productive and less stressful.
Related Topics
kids shared bedroom
space-saving furniture
playful themes
shared room organization
bunk beds
color-coded zones
multi-purpose furniture
DIY decor
family-friendly design
under-bed storage
interactive wall decor
cozy reading nook